Rooted Samsung Android 14
0x00 - Intro
I’d like to share one of my guides on how to setup my Samsung Android device for pentesting purposes, from the beginning (android device rooting) until setting up certificates for proxy interception. Once everything is set, we can use it to perform APK pentesting engagements using our rooted android device.
At this time of writing, I have a personal device that I’m gonna use for my next APK-based pentest engagements. Within this note, I’ll show you on how to root my old (Android 14) Samsung smartphone (device) for fun that youse can use it in an Android/APK pentests or bug bounty hunting engagements. If you’re using other Samsung Android OS versions, starting from Android 9 to Android 15, youse can also follow along to practice your device rooting skills.
Please not that my Android has been on factory reset thus the warranty has been void, so this steps could be different depending on how would you root the process.
0x001 - Table of contents
- 0x00 - Intro
- 0x001 - Table of contents
- 0x01 - Installing Prerequisites
- 0x02 - Steps for rooting Android
- 0x03 - Installing Proxy Certificates
- 0xff - External Sources and Other Guides
0x01 - Installing Prerequisites
Make sure that you have everything setup for the rooting process. Here, I’m using SM-G998B/DS as a rooting device, as well as several other tools that might reliable for the rooting process.
- Android ADB from
platform-tools, which can be installed in two ways:- Android Studio has embedded Sdk function of
platform-tools - Manual download link with no Android Studio required
- Android Studio has embedded Sdk function of
- Stock Samsung Firmware, which can be installed in two ways
- SamFw
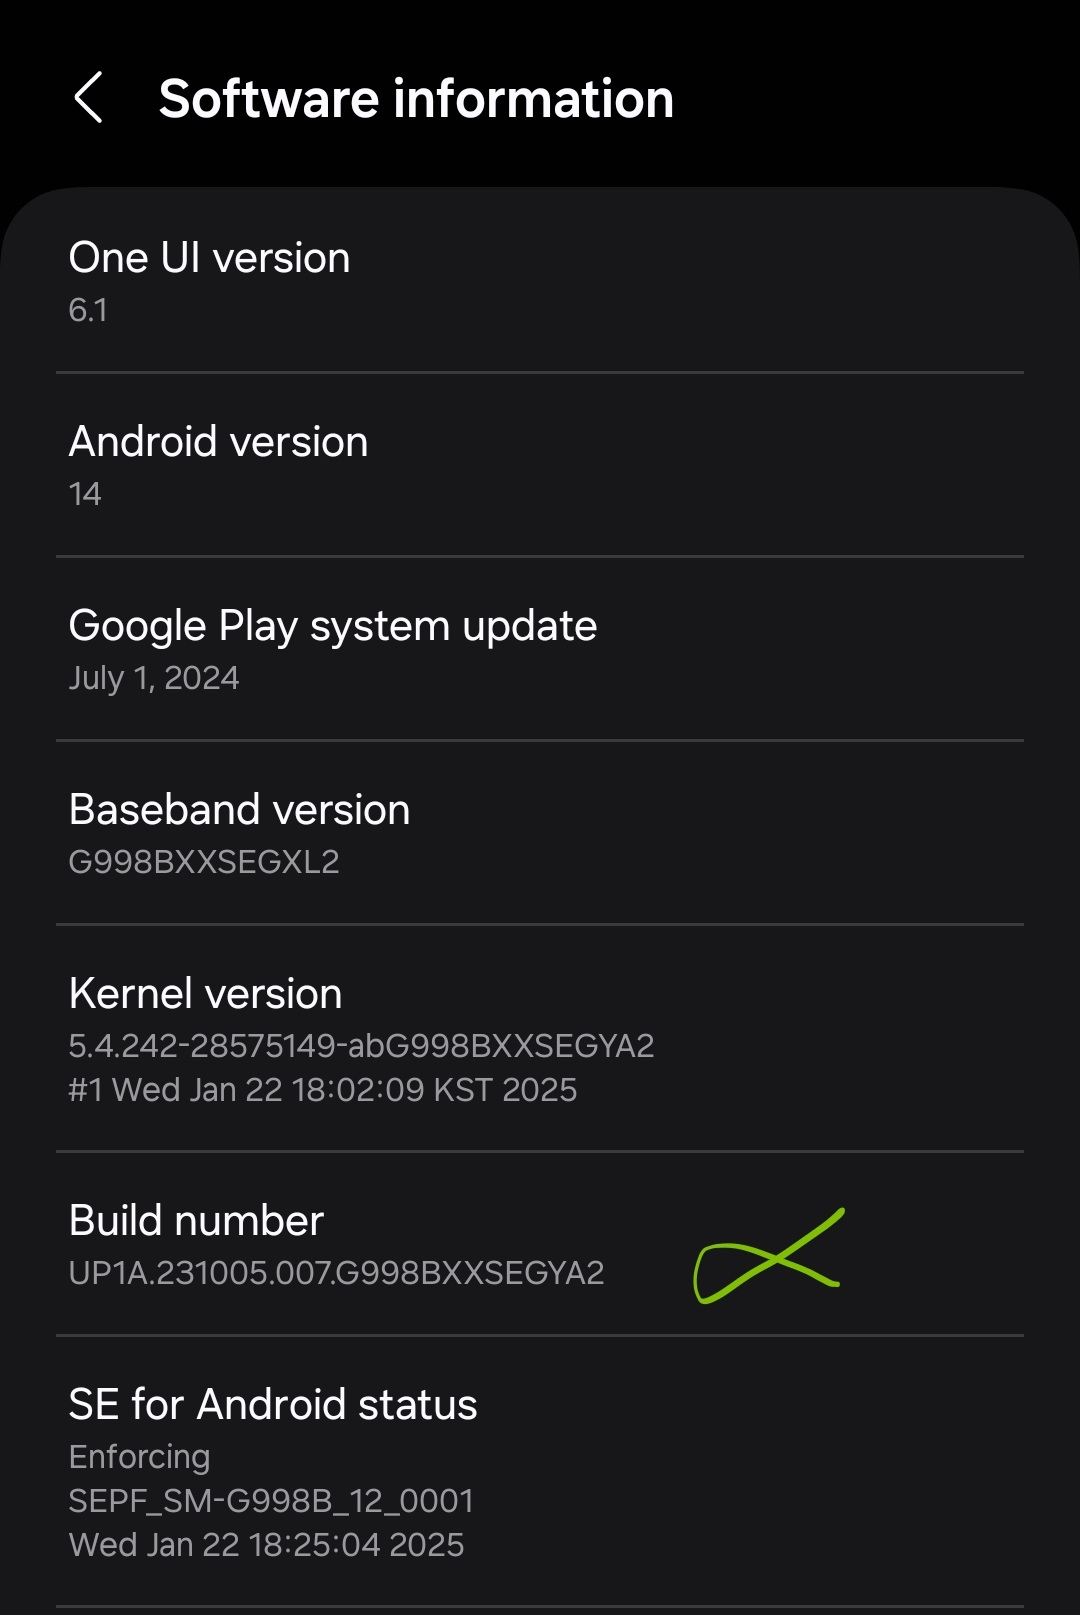
- Check your current firmware under the Settings > About phone > Software information > Baseband version
- Copy the Baseband version number (starts from
G998BXXXXXXXX) and use it to download the firmwares - Make sure that the firmware you’ll download (on the Download SamFw Server button) in accordance with the region you’re located in
- Once it’s downloaded, extract the downloaded ZIP file
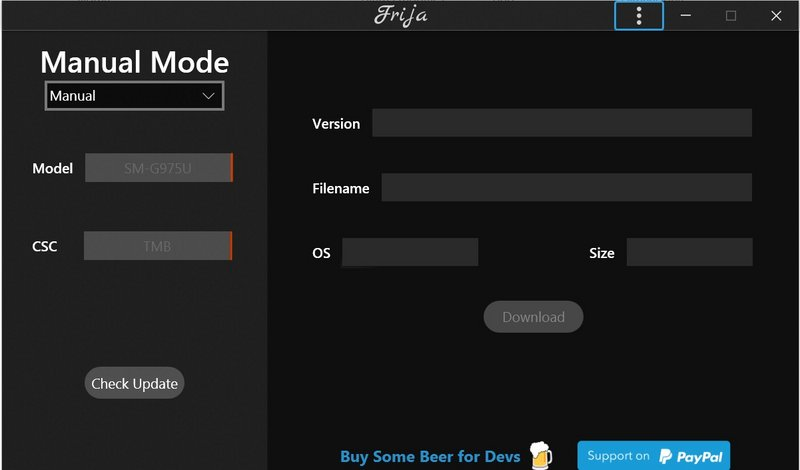
- Frija (Windows Only)
- Ensure to fill in the details of the model name, CSC (the local code; i.e. XID), and serial number device
- The UI should looked like this, especially for the updated version
- SamFw
- Magisk App (download link, make sure to download the latest one)
- Proxy Certificates (we’ll be using
cacert.derfrom Burp Suite)
0x02 - Steps for rooting Android
0x021 - Unlock OEM and Enable USB Debugging through Developer Mode
Prerequisites:
- None
First, we need to enable the Developer mode in Settings, which can be enabled by going to the Settings > About phone > Software information. Then, we need to tap on the Build number for seven times. Once it’s done, enter the security PIN/Password/Pattern as required.
 After that, the pop-up
 Developer mode has been enabled! will show up.
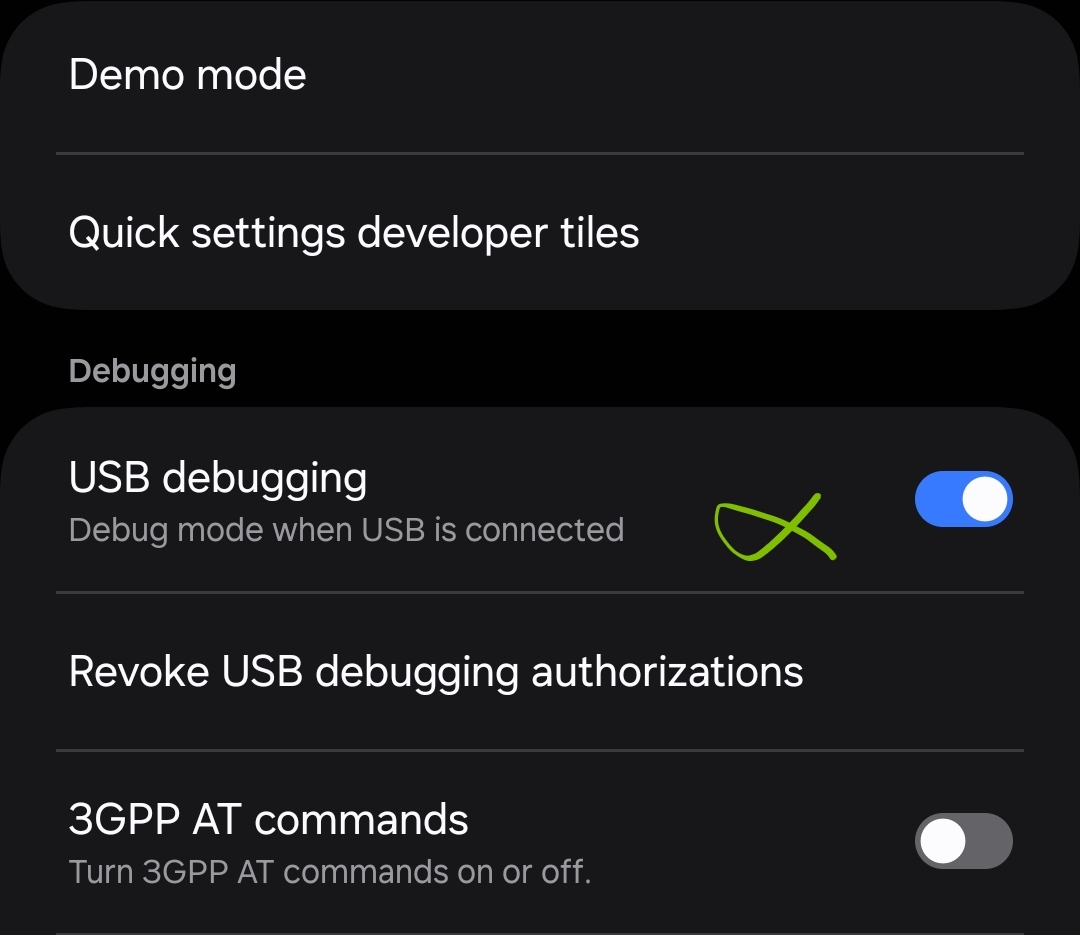
Next, once the Developer mode has been enabled, go to that menu, which is located in the bottom of the Settings menu. Then, we need to enable two options to unlock bootloader and enable USB debugging by toggling them into ON, which in the options are:
- OEM unlocking

- USB debugging
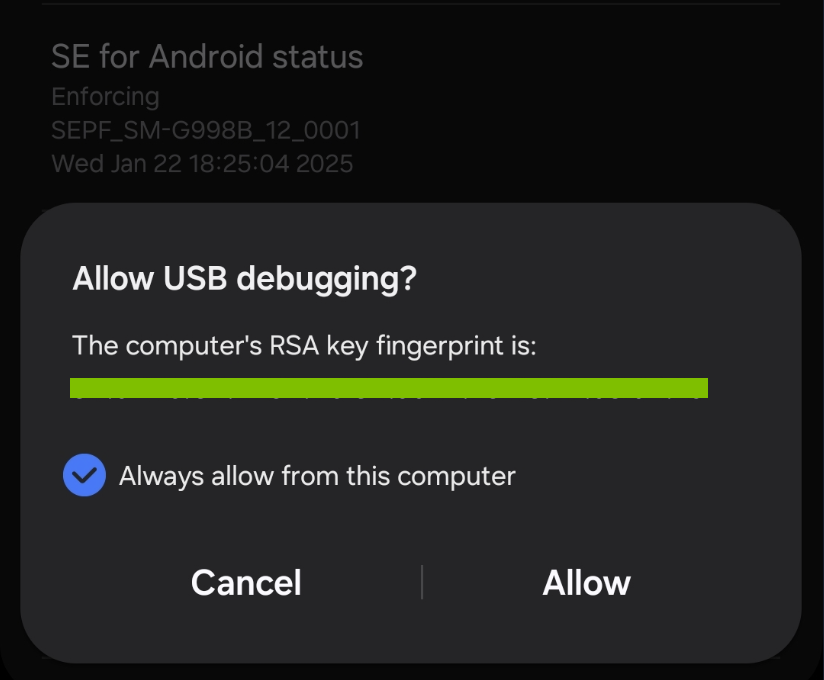
To verify that the USB debugging is enabled, connect the Android to the laptop and run the following adb command.
$ adb devices
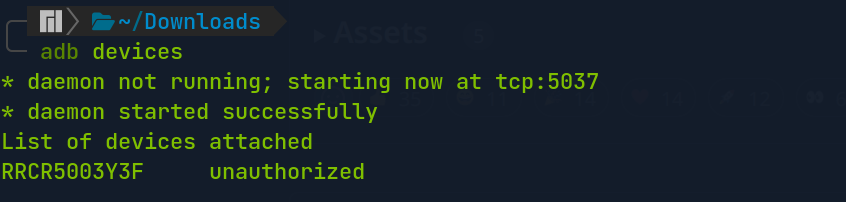
The option Allow USB debugging? will show up on the Android, then we tap Allow. If we run the adb devices command again, the output unauthorized will be disappeared.

0x022 - Create the Magisk-Patched File
Prerequisites:
- Samsung (AP) Firmware
- Magisk App
Once everything is set, we can export both Samsung AP Firmware and Magisk App files using adb push command, directing it to the /sdcard/Download/ of the connected Android.
$ adb push /location/of/Magisk-v28.1.apk /sdcard/Download/
$ adb push /location/of/SAMFW_/AP_ /sdcard/Download/

Then, we can install Magisk App on the Android, which is located under the /sdcard/Downloads. Follow the downloading steps until the Magisk has been installed.
The next step is to create the Magisk-Patched AP Firmware, which requires Stock AP Firmware from Samsung that we’ve exported. To do that, first, we tap the Install on the Magisk section.
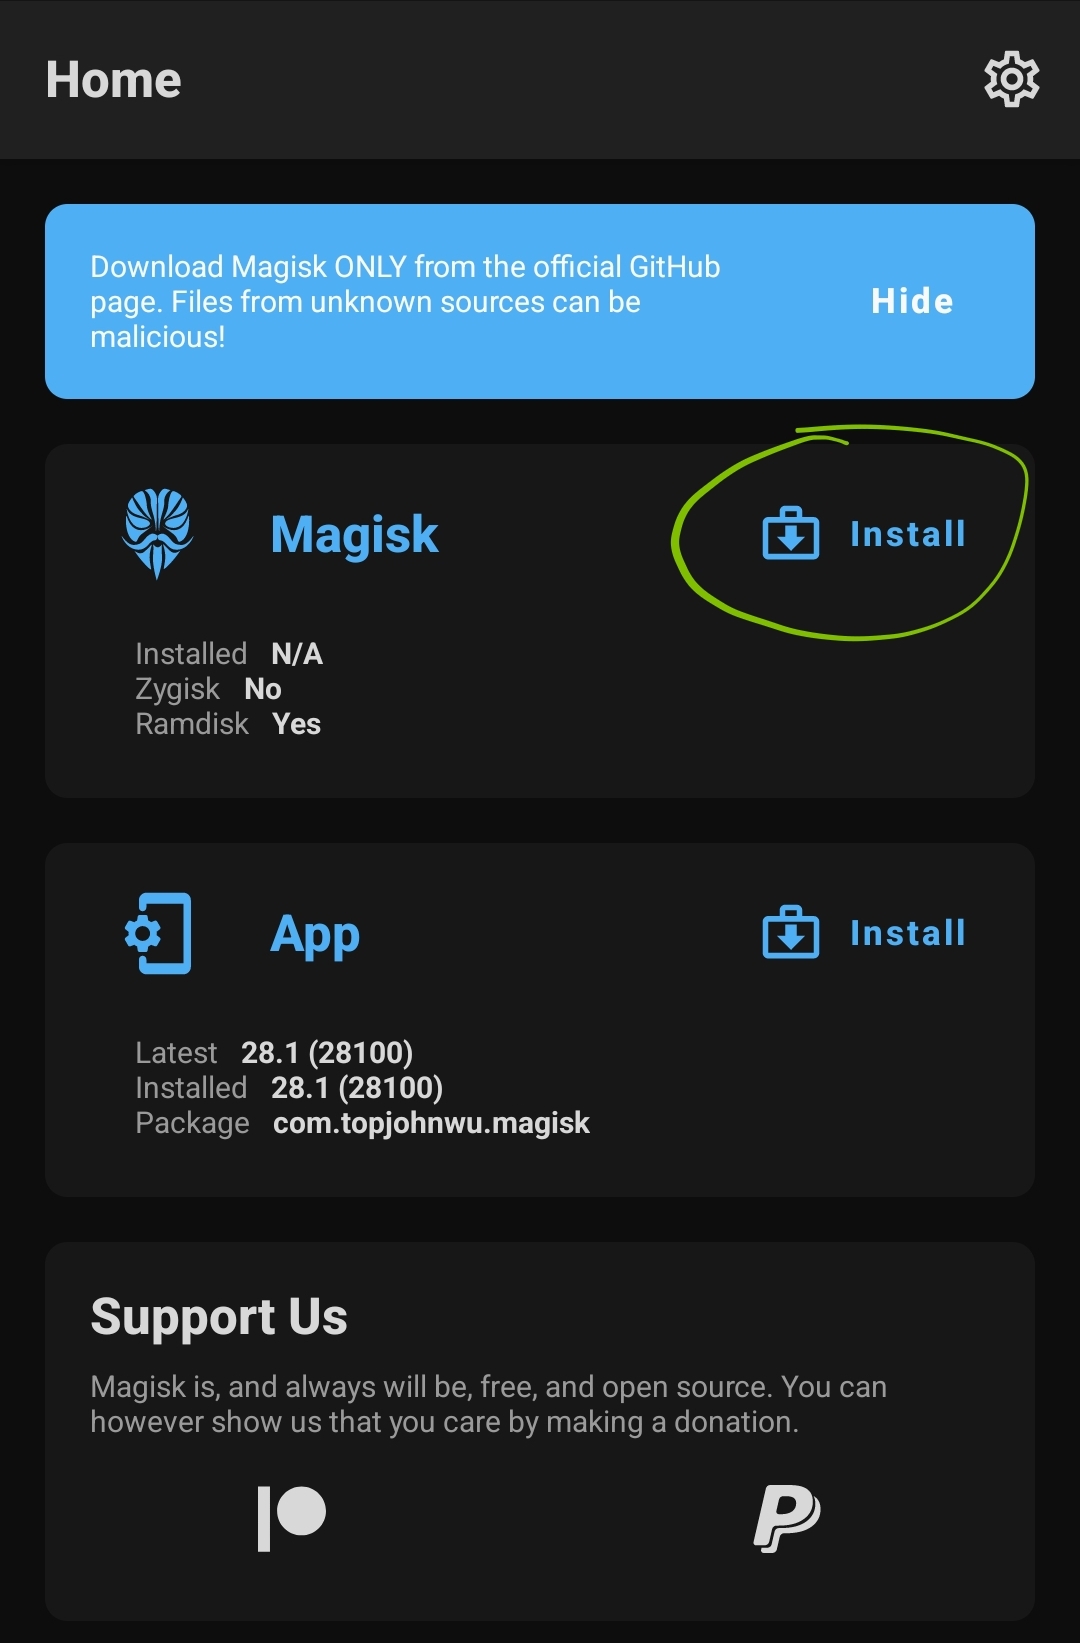
Then, tap Select and Patch a file and choose the uploaded AP file.
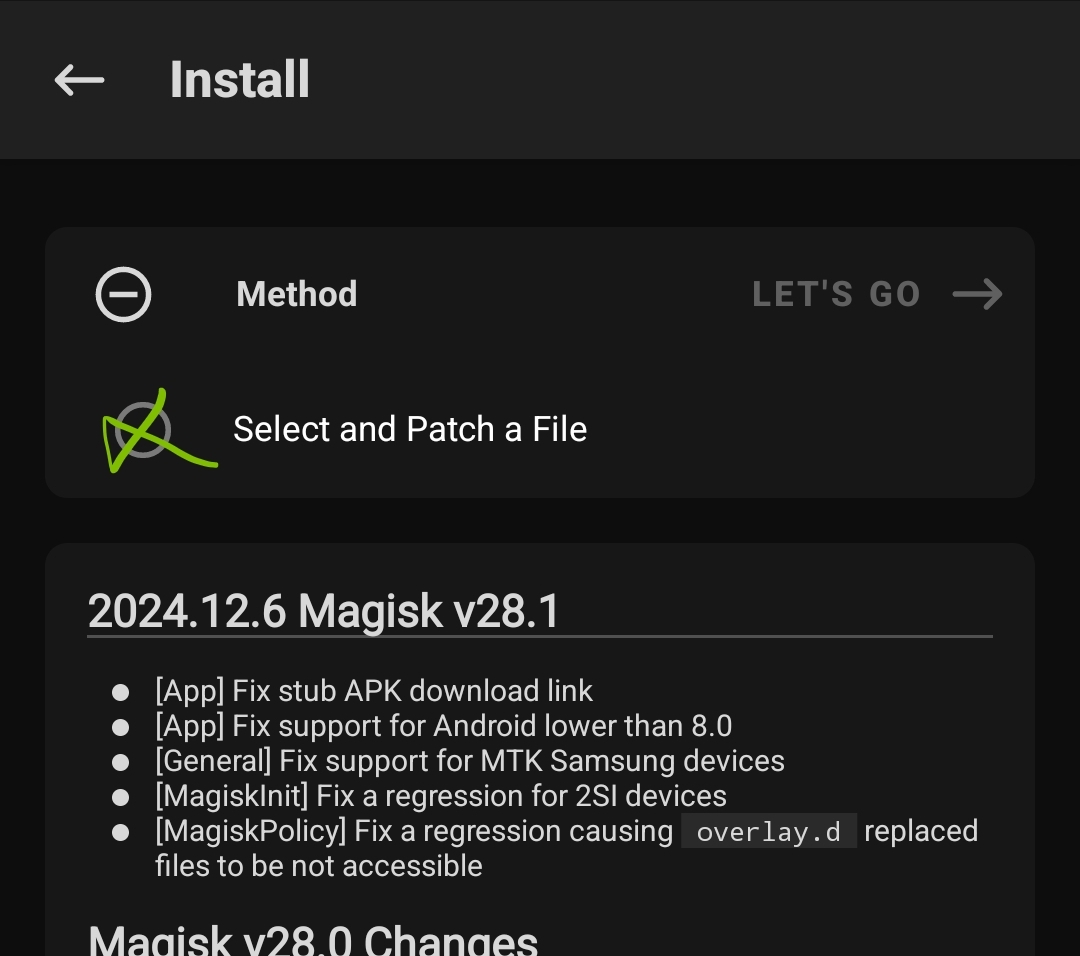
After that, we can start patching by tapping the LET’S GO button. Wait for the patch file to be installed.
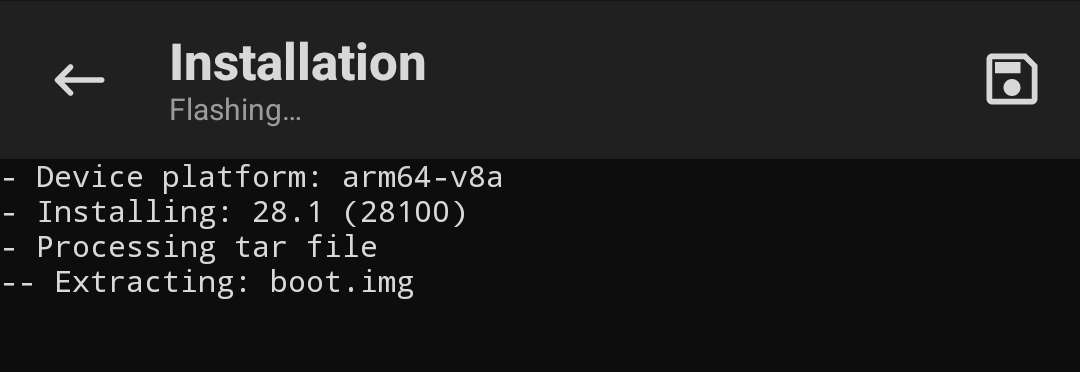
Once everything it’s done which will be stored in the /storage/emulated/0/Download/magisk_patched-xxxxx_xxxxx.tar directory.
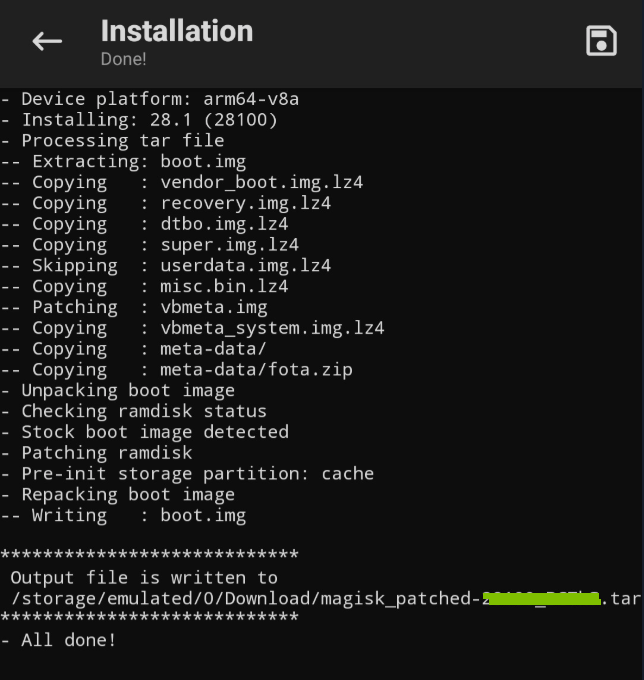
After the Magisk created the patched AP firmware, we can import it from the Android using adb pull command.
$ adb pull /storage/emulated/0/Download/magisk_patched-xxxxx_xxxxx.tar .

0x023 - Unlocking Samsung Bootloader
Prerequisites:
- None
To perform Samsung Bootloader unlock, ensure the android is connected to the laptop. Before you’ll going to unlock, make sure to follow the several steps first.
- (Temporarily) Disable security PIN/Password/Pattern
- Backup any important data, including any important accounts and files that you have
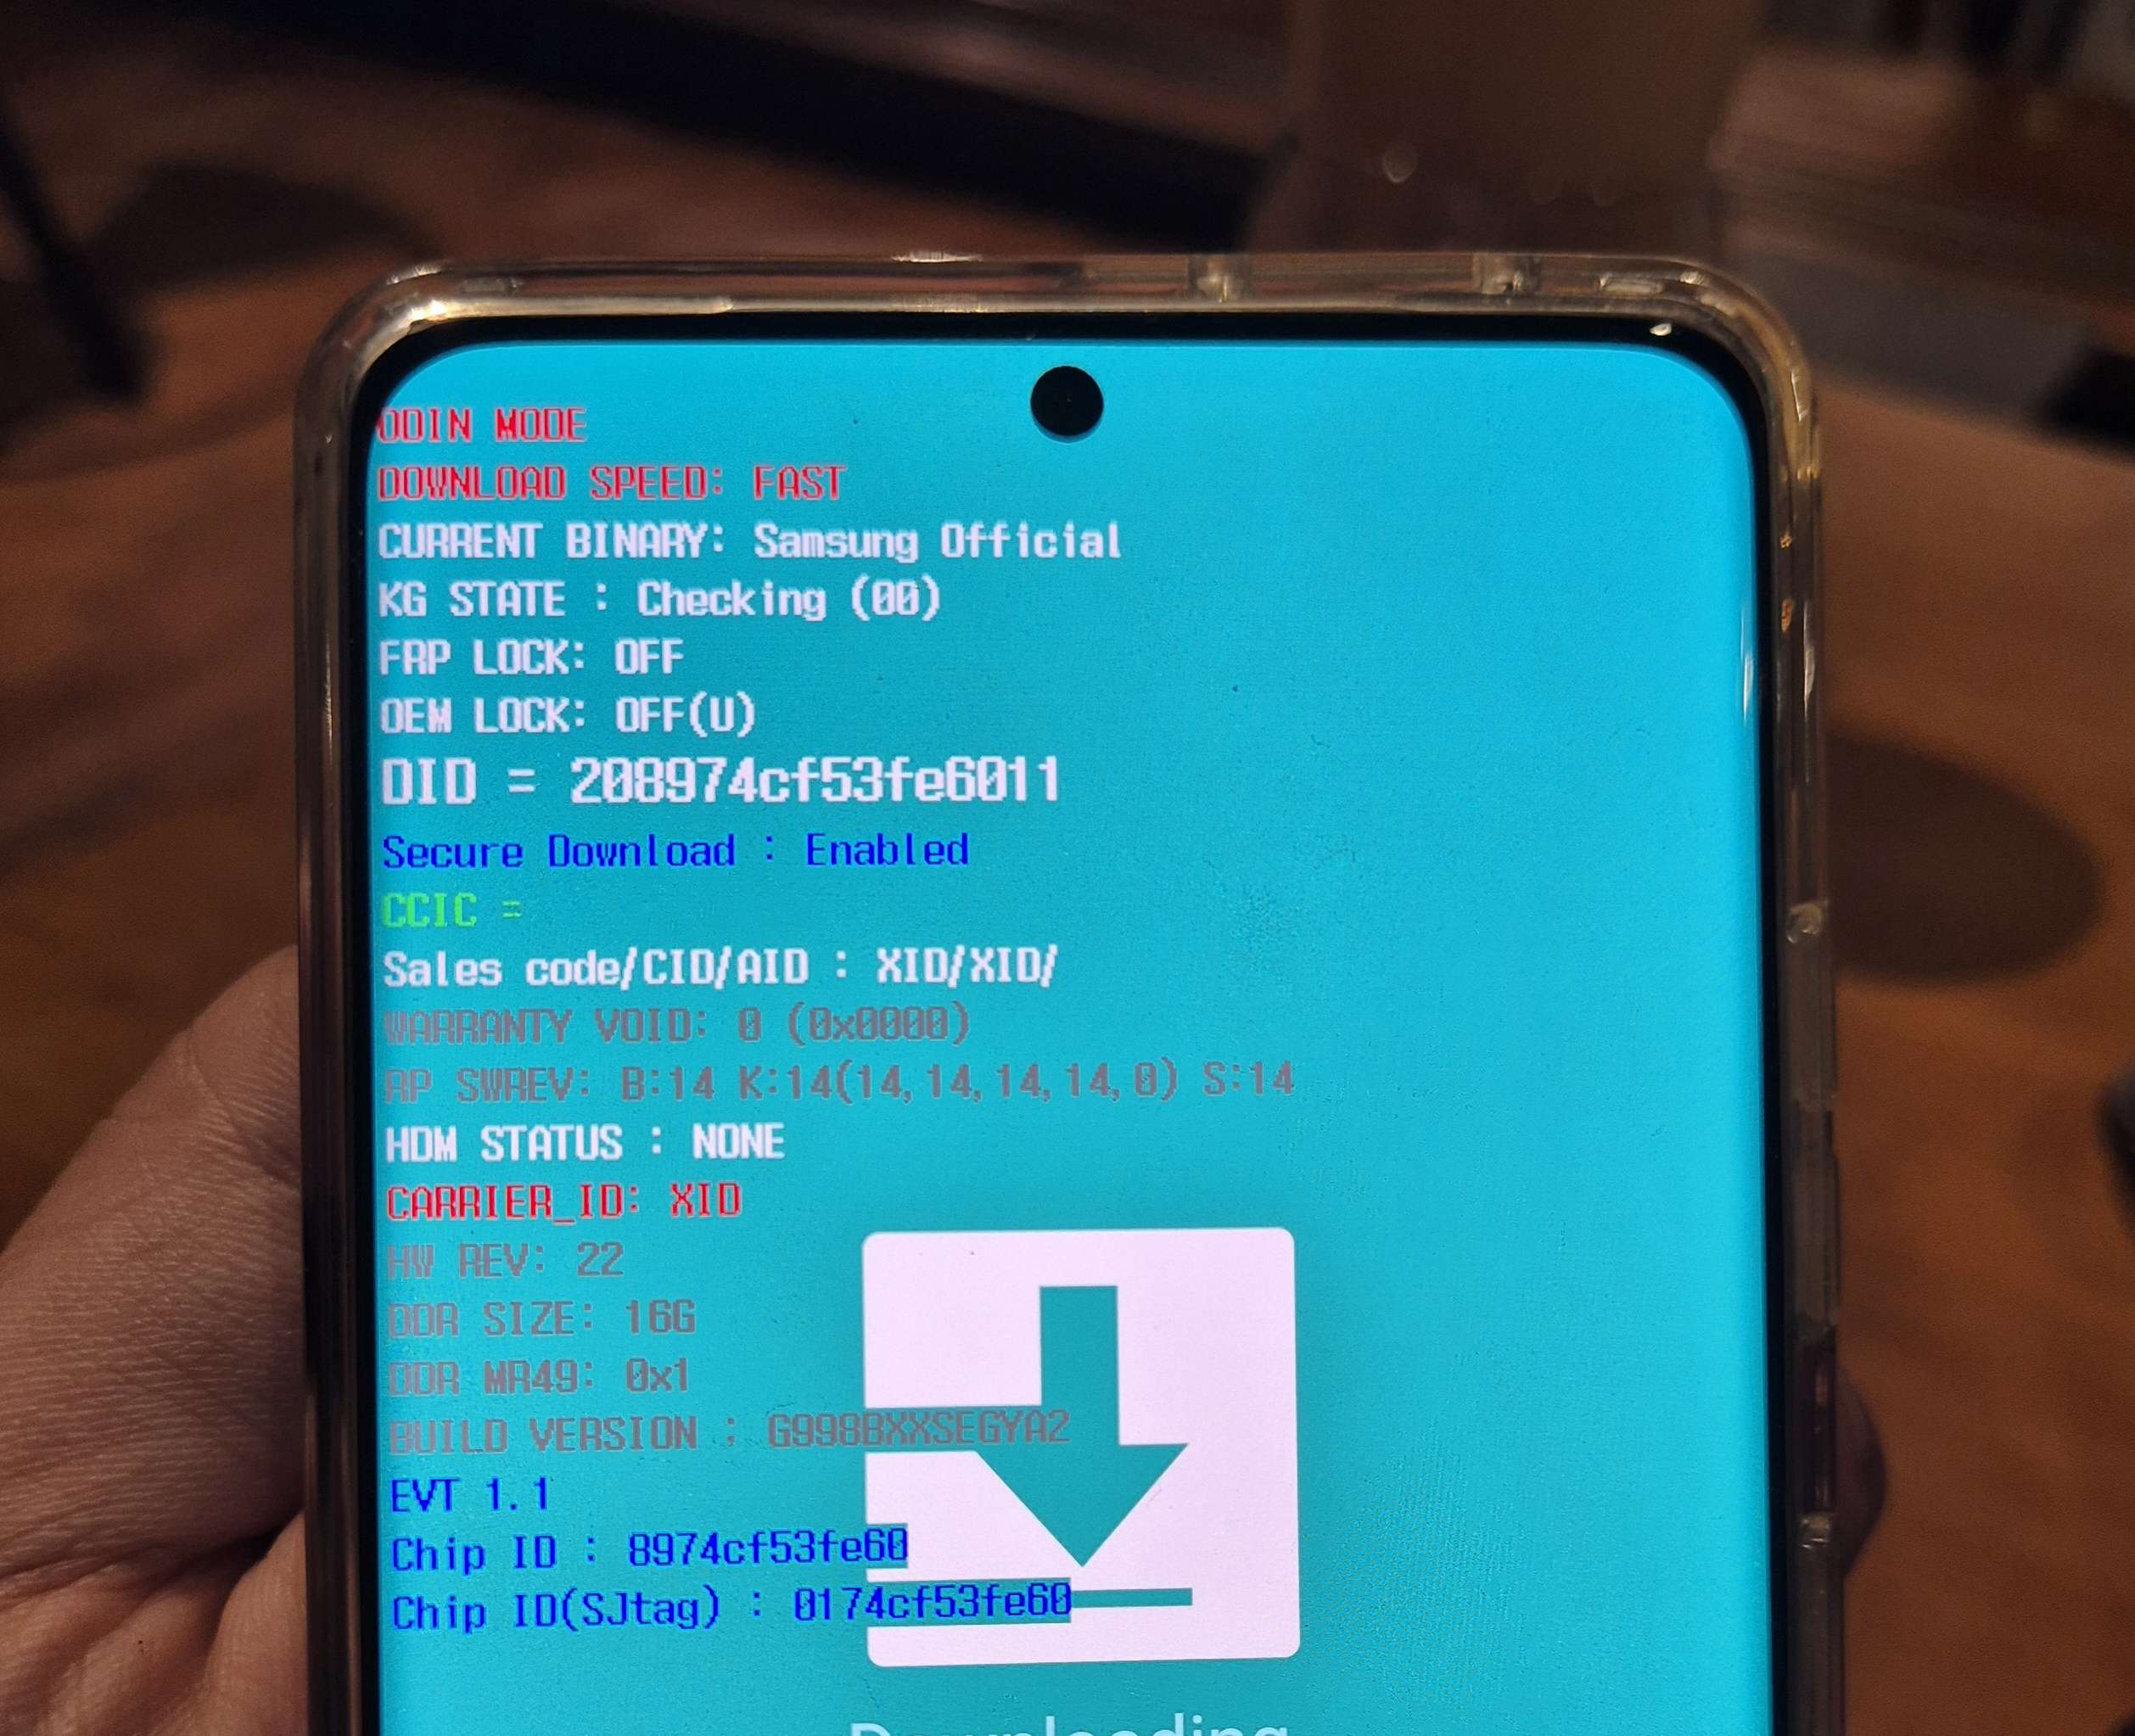
After it’s done, restart the Android while it’s still connected to the laptop. Once we tap the Restart button, Press both volume buttons (Volume Up + Volume Down) simultaneously and wait until the screen shows the Warning.
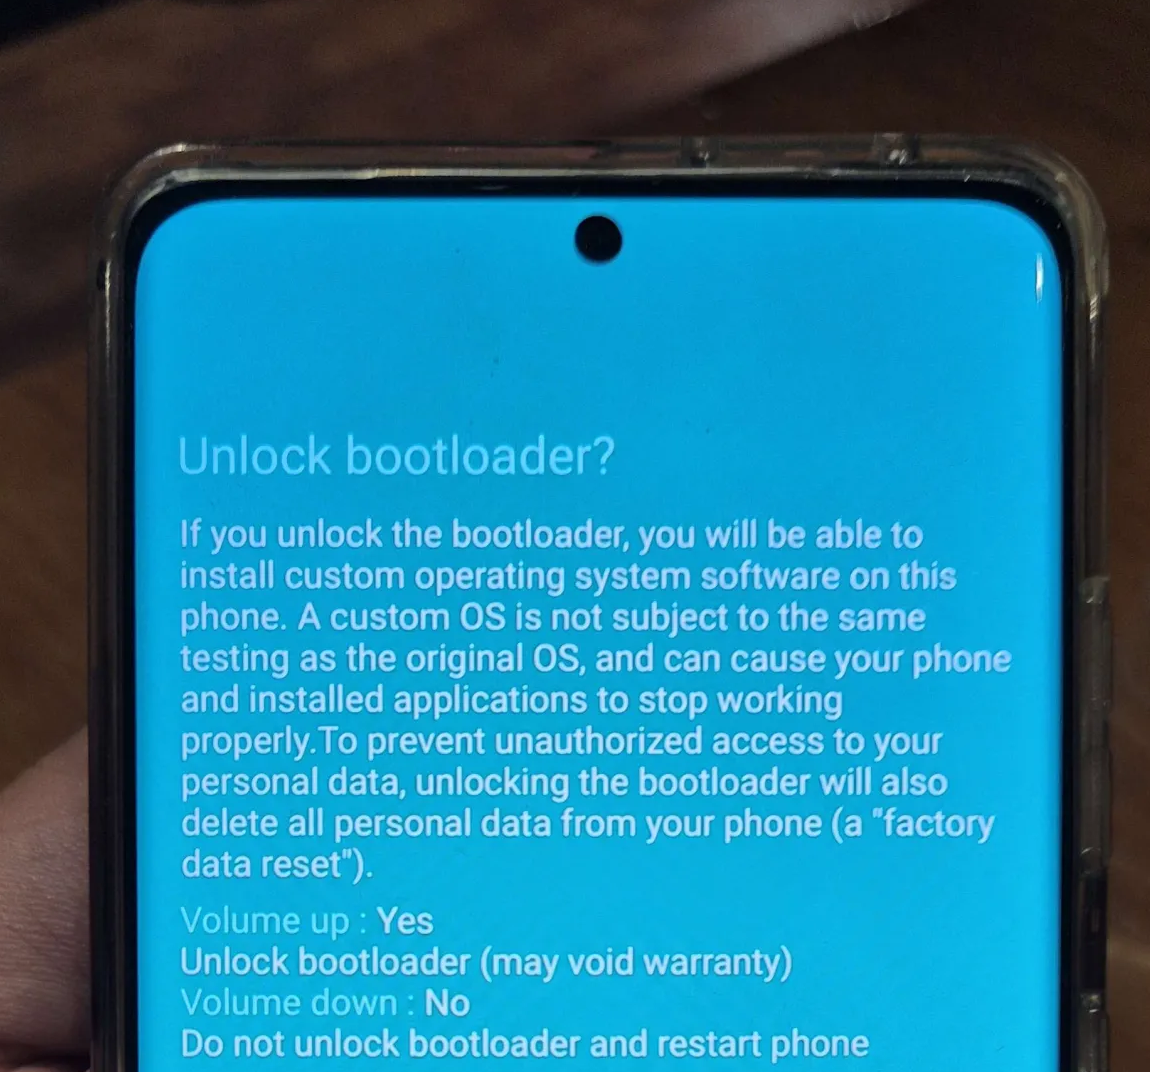
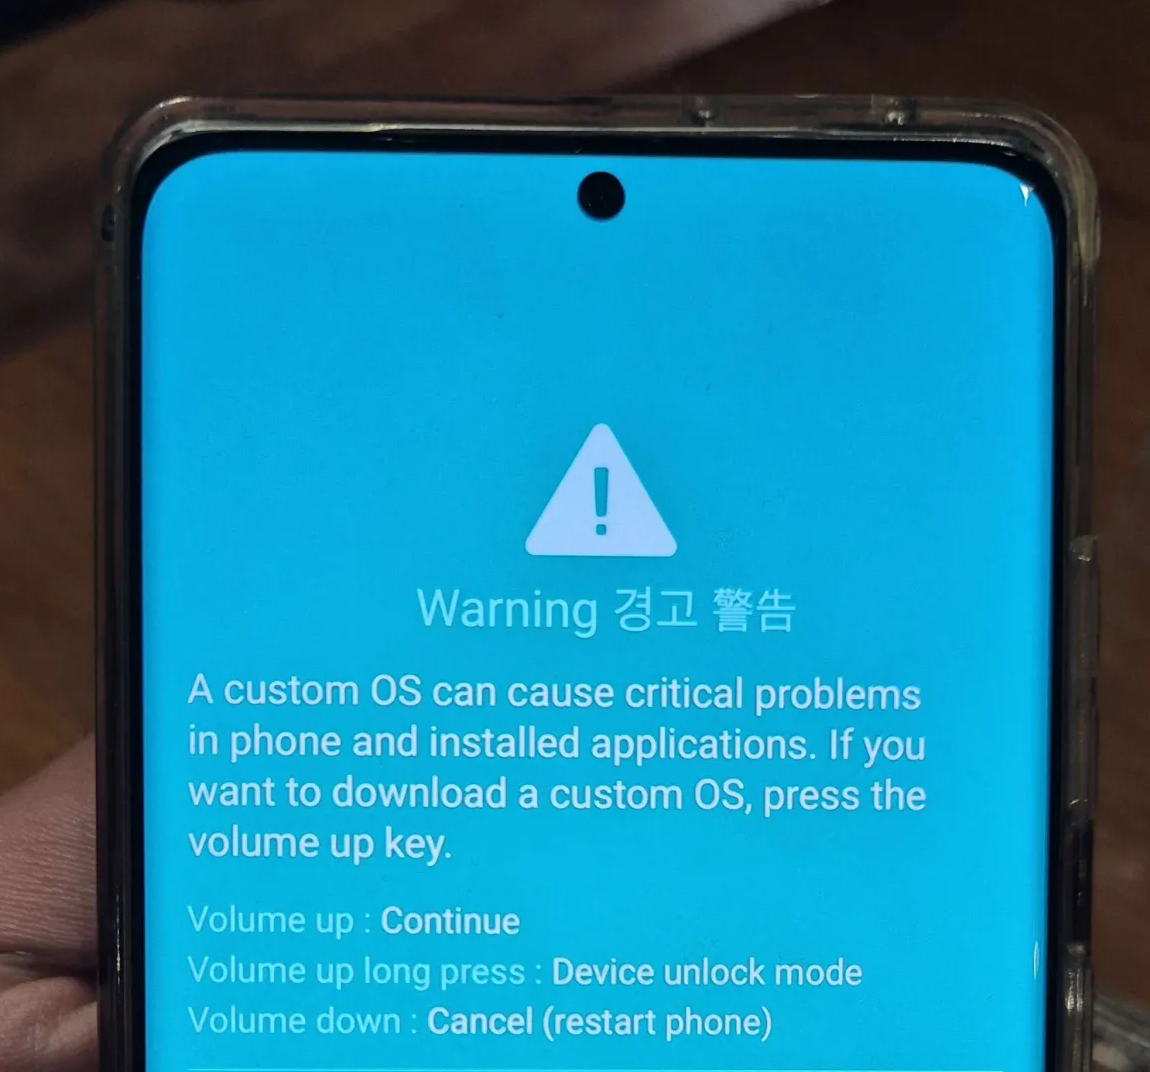 After the Warning screen, long press the Volume Up button to perform Device unlock mode, then we’ll be redirected to the Unlock bootloader? screen. Press Volume Up button to accept.
 Once it’s done, we’ll be redirected to another following warning screen.
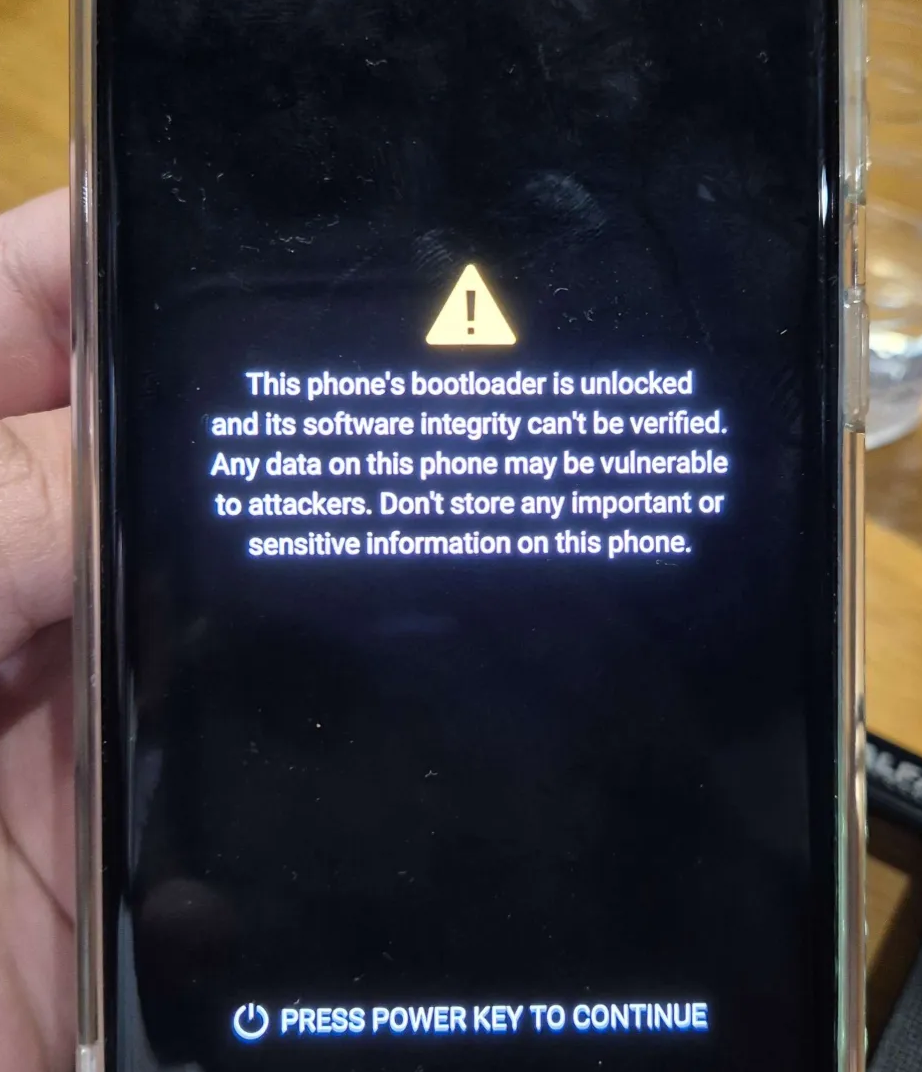 We don’t need to press the Power Key. The android will perform unlock bootloader until we’re going to the Samsung Device Setup, which affirms the bootloader unlocking process has been completed.
After that, we can verify that the bootloader has been unlocked by referring back at the [[#0x021 - Unlock OEM and Enable USB Debugging through Developer Mode]] steps, as well as enabling the USB debugging.
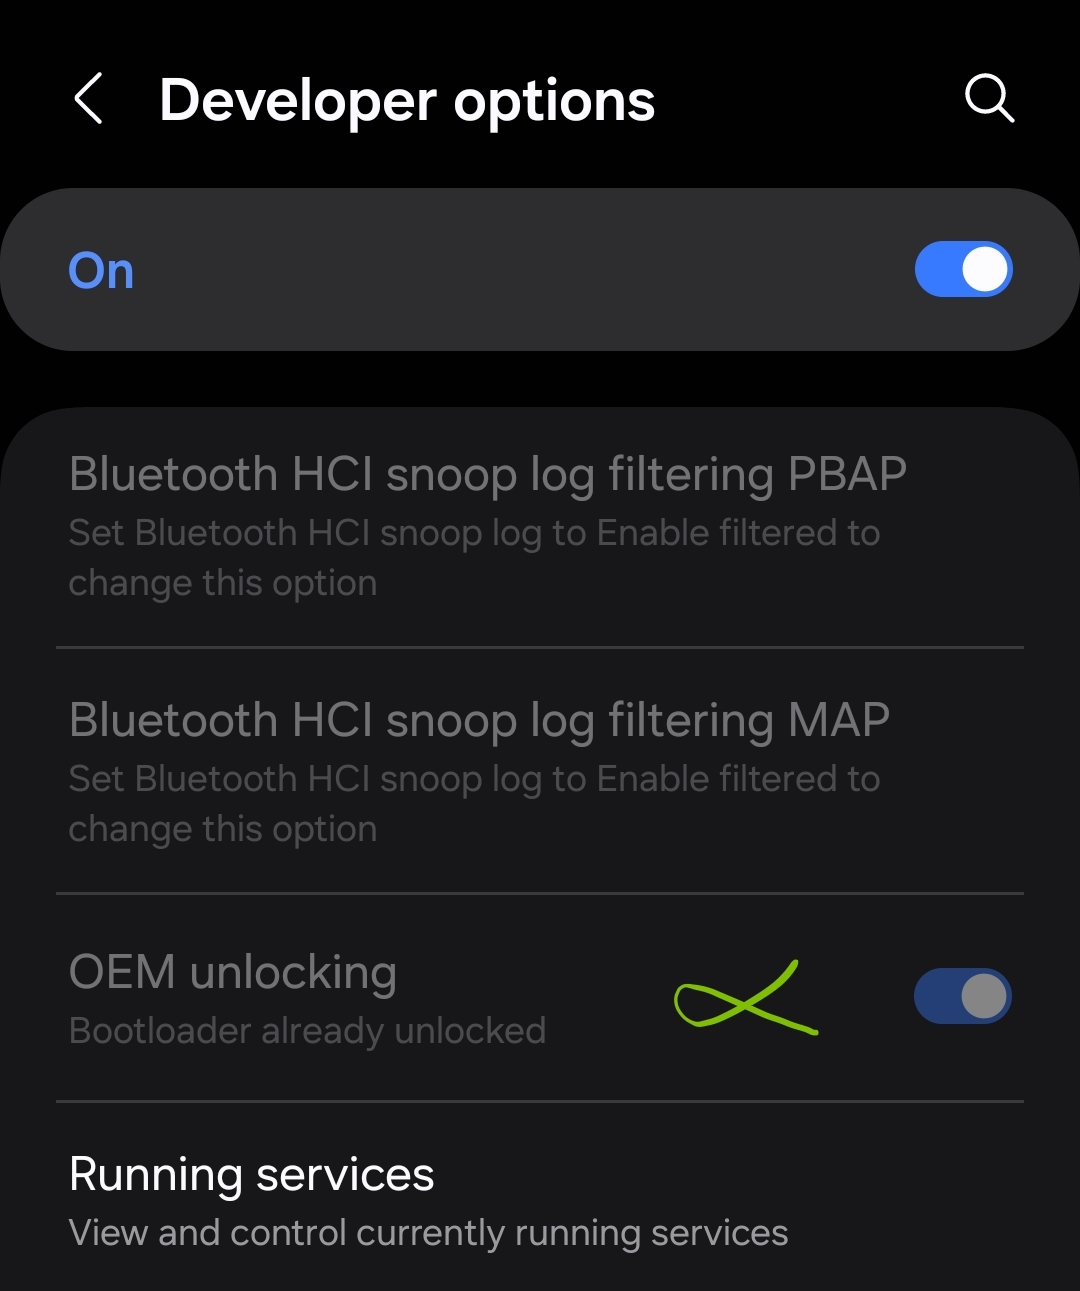 As we can see, the option OEM unlocking has been enabled and it can’t be disabled.
0x024 - Flash the Magisk Patched Firmware
Prerequisites:
- Magisk-patched AP firmware
- All of Samsung firmwares
This is where the fun part begins. As we’ll going to flash the patched firmware, we’re going for the Download Mode first. The steps are the same as [[#0x023 - Unlocking Samsung Bootloader]] (pressing both Volume Buttons simultaneously while on restart), only the difference is when we’re on the Warning screen, press the Volume Up button until we obtained the following message screen, meaning we entered into Download Mode.
Now, we can launch the odin4 command. First, we need to define the device name that connected to the laptop
$ odin4 -l

Then, copy the output of the previous command and flash the android with the following odin4 command. Make sure to follow the flags in accordance with the image files
-bfor Bootloader (BL) file-afor AP image file (make sure to use with the Magisk-patched file)-cfor CP image file-sfor CSC image file (make sure to not load it with theHOME_CSC_file)$ odin4 -b BL_G998Bxxxxxx.tar.md5 -a magisk_patched-xxxxx_xxxxx.tar -c CP_G998Bxxxxxx.tar.md5 -s CSC_OLE_G998Bxxxxxx.tar.md5 -d /dev/bus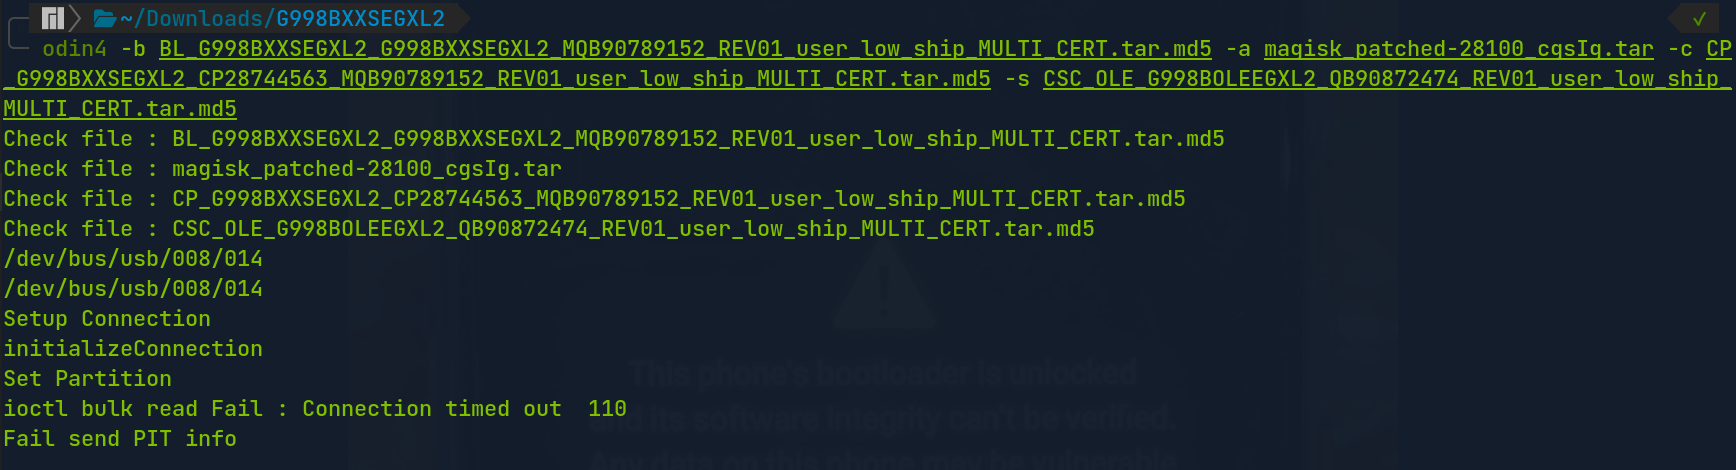
0x0241 - Fixing ioctl bulk read Fail error
During my previous testing, I got the following error
...
Set Partition
ioctl bulk read Fail : Connection timed out  110
Fail send PIT info
I stumbled for the forums and I found this guide on how to fix the error. This requires an additional file 51-android.rules, which can be obtained from this repository 51-android.
This rule is known as the rules for udev subsystem/kernel device manager that contains a USB configuration for each type of device for development. The rules contain each device manufacturer, which are identified by a unique vendor ID, as specified by the ATTR{idVendor} property.
The installation is pretty easy, which requires writing the 51-android.rules in the directory /etc/udev/rules.d/, adding the new rules in the appropriate command, and restart the udev.
$ sudo curl --create-dirs -L -o /etc/udev/rules.d/51-android.rules https://raw.githubusercontent.com/snowdream/51-android/master/51-android.rules

$ sudo chmod a+r /etc/udev/rules.d/51-android.rules

# Debian-based command
$ sudo service udev restart

# Arch-based command
$ sudo systemctl restart systemd-udevd
Once the 51-android.rules has been installed, verify if the rules has Samsung Electronics configuration, by specifying the ATTR 04e8

Does this mean that the problem is solved? NO.
As it turns out, checking the lsusb shows my current android has been misidentified under GT-I9100, instead of SM-G998B.

0x0242 - Last Resort
Due to the personal time constraint, I tried using Odin on another Windows PC by installing [Odin v3], copy the entire firmwares in my personal device, including the AP firmware that has been patched with Magisk, and try flashing the firmware again.
To save some time during my rooting process, here’s the steps that you can follow to perform the rooting process.
- Download the the Samsung firmwares with Frija, in accordance with the region through CSC code. Once its done, extract the file
- Export the AP firmware file to the android, then, create a custom patch of the exported AP firmware file with Magisk (see 0x022 - Create the Magisk-Patched File)
- Export the patched AP firmware back to the PC (I’m using Windows, the steps are the same with Linux as well)
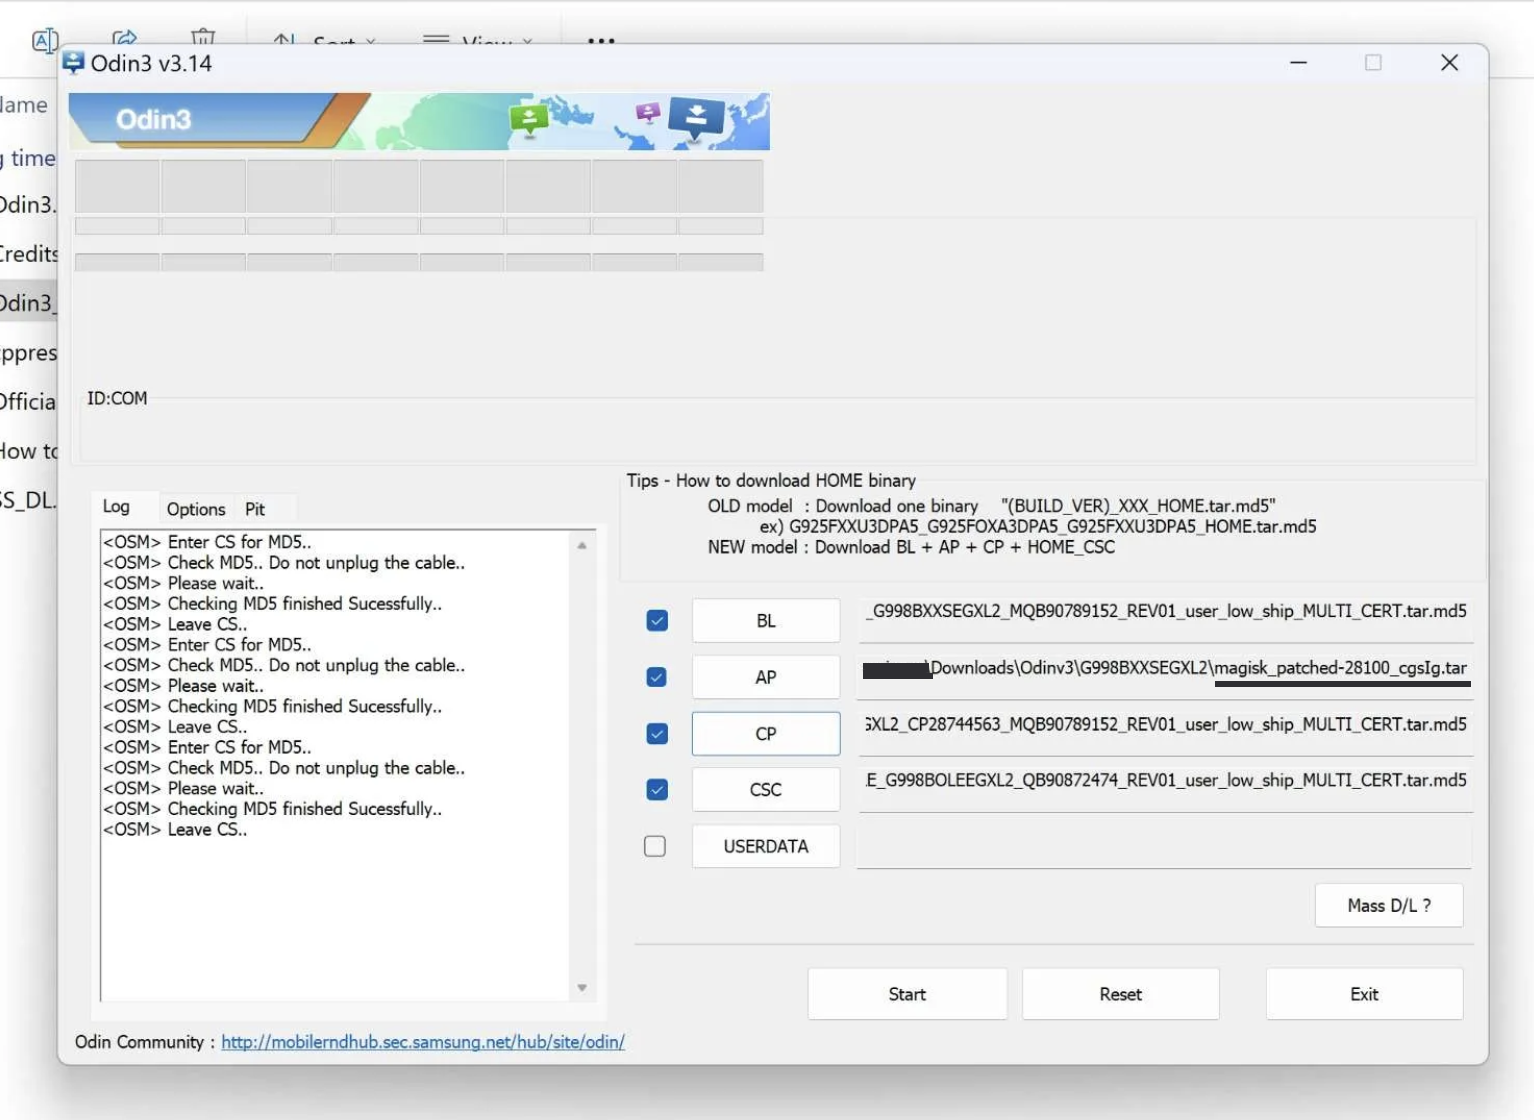
- Since I’m running Windows PC for the last resort, connect the android to the PC and make sure to enter the Download Mode. If it’s succeeded, the log file on Odin3 will display
<ID:0/008> Added!!warning log.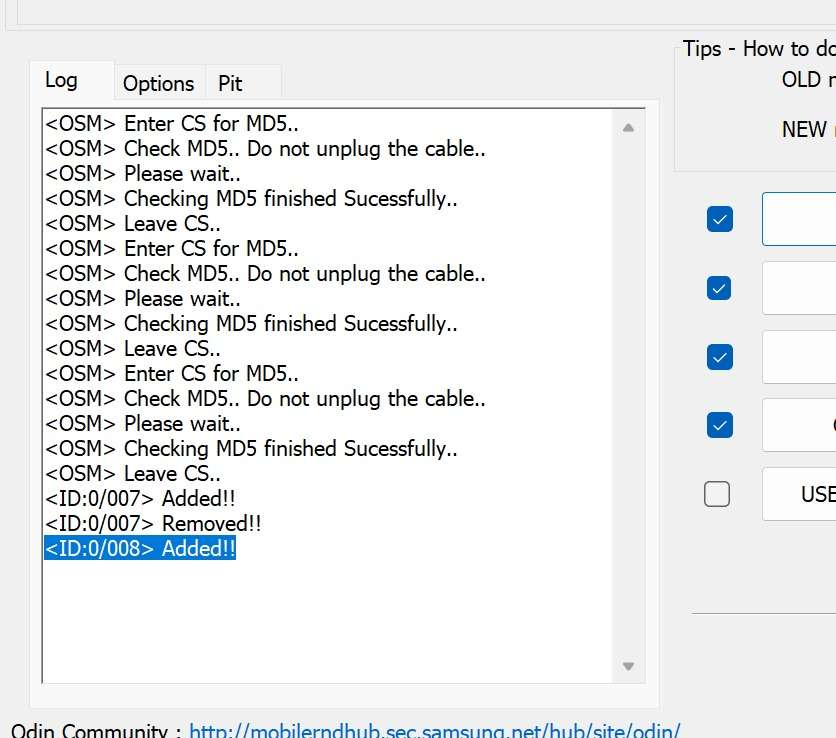
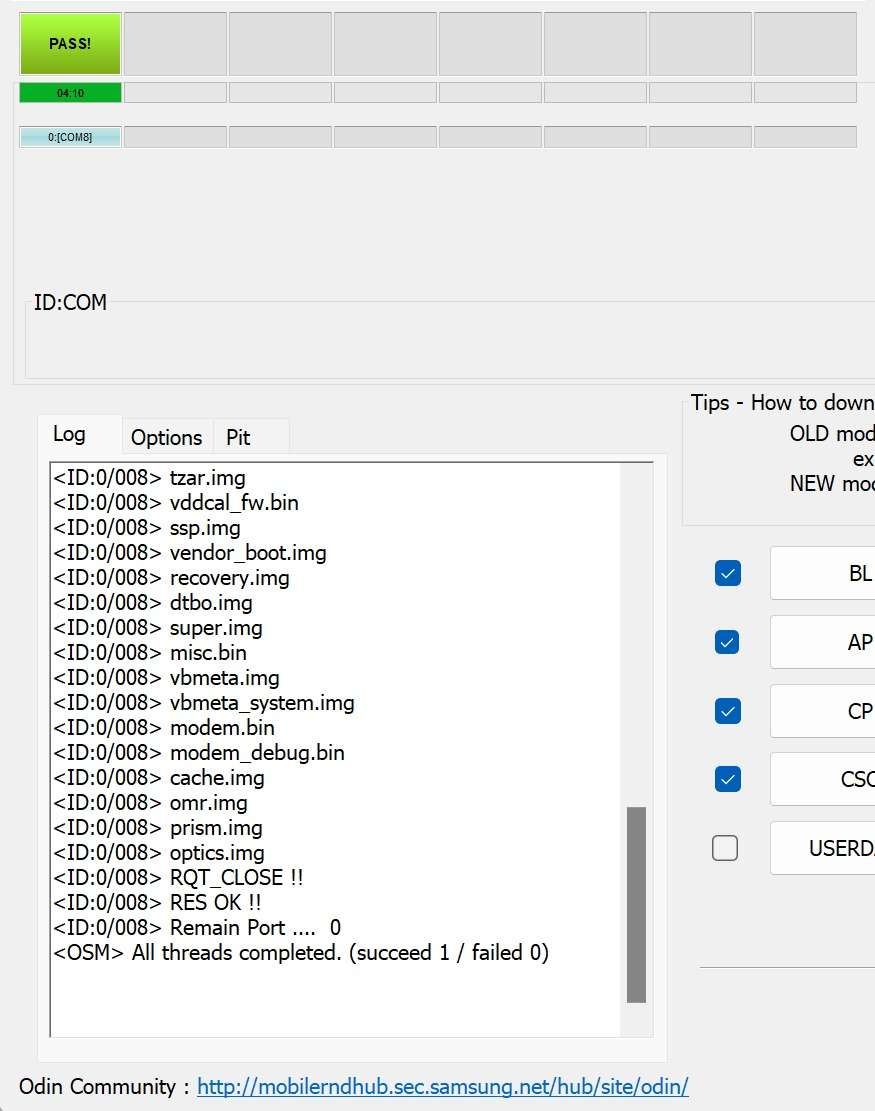
- Once everything is set, click the Start button to initialize flash the firmware. Wait for the flashing process until the Odin3 log file has a message that the flashing process was successful, thus the android got rebooted and we’ll be redirected into Android Recovery Mode.
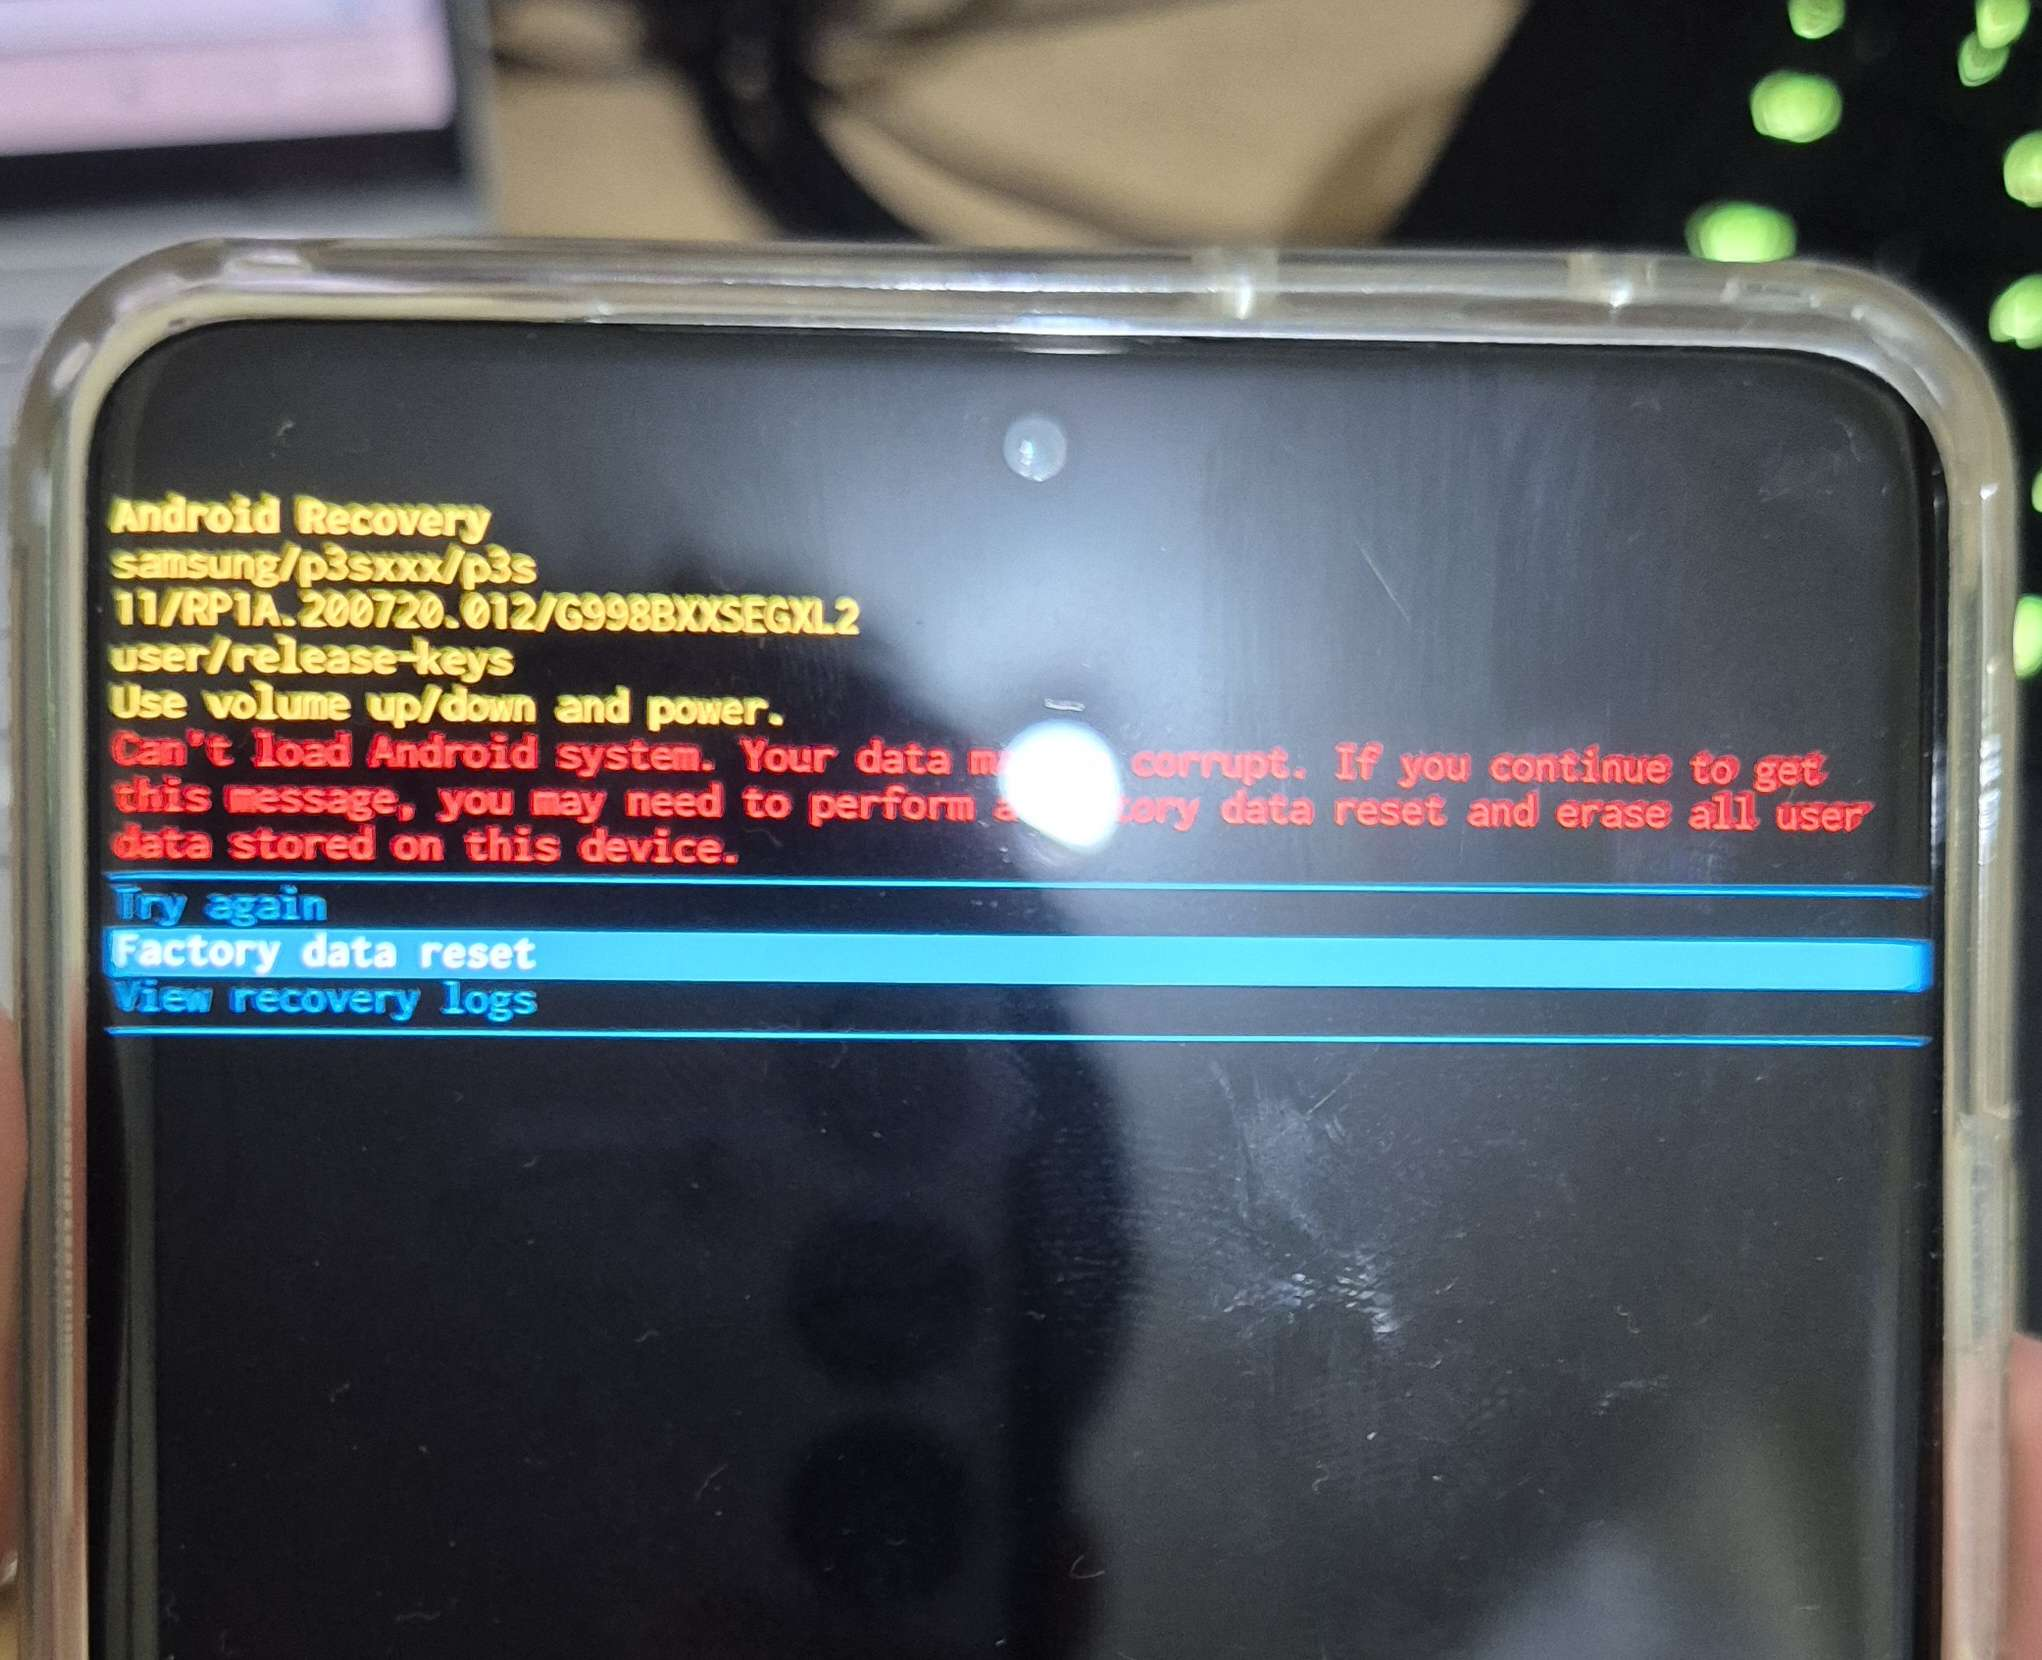
- Click the
Factory data resetwith the Power Key/Side button.
- Click the
- Finally, the flashing process was successful, thus the android has been rooted successfully.
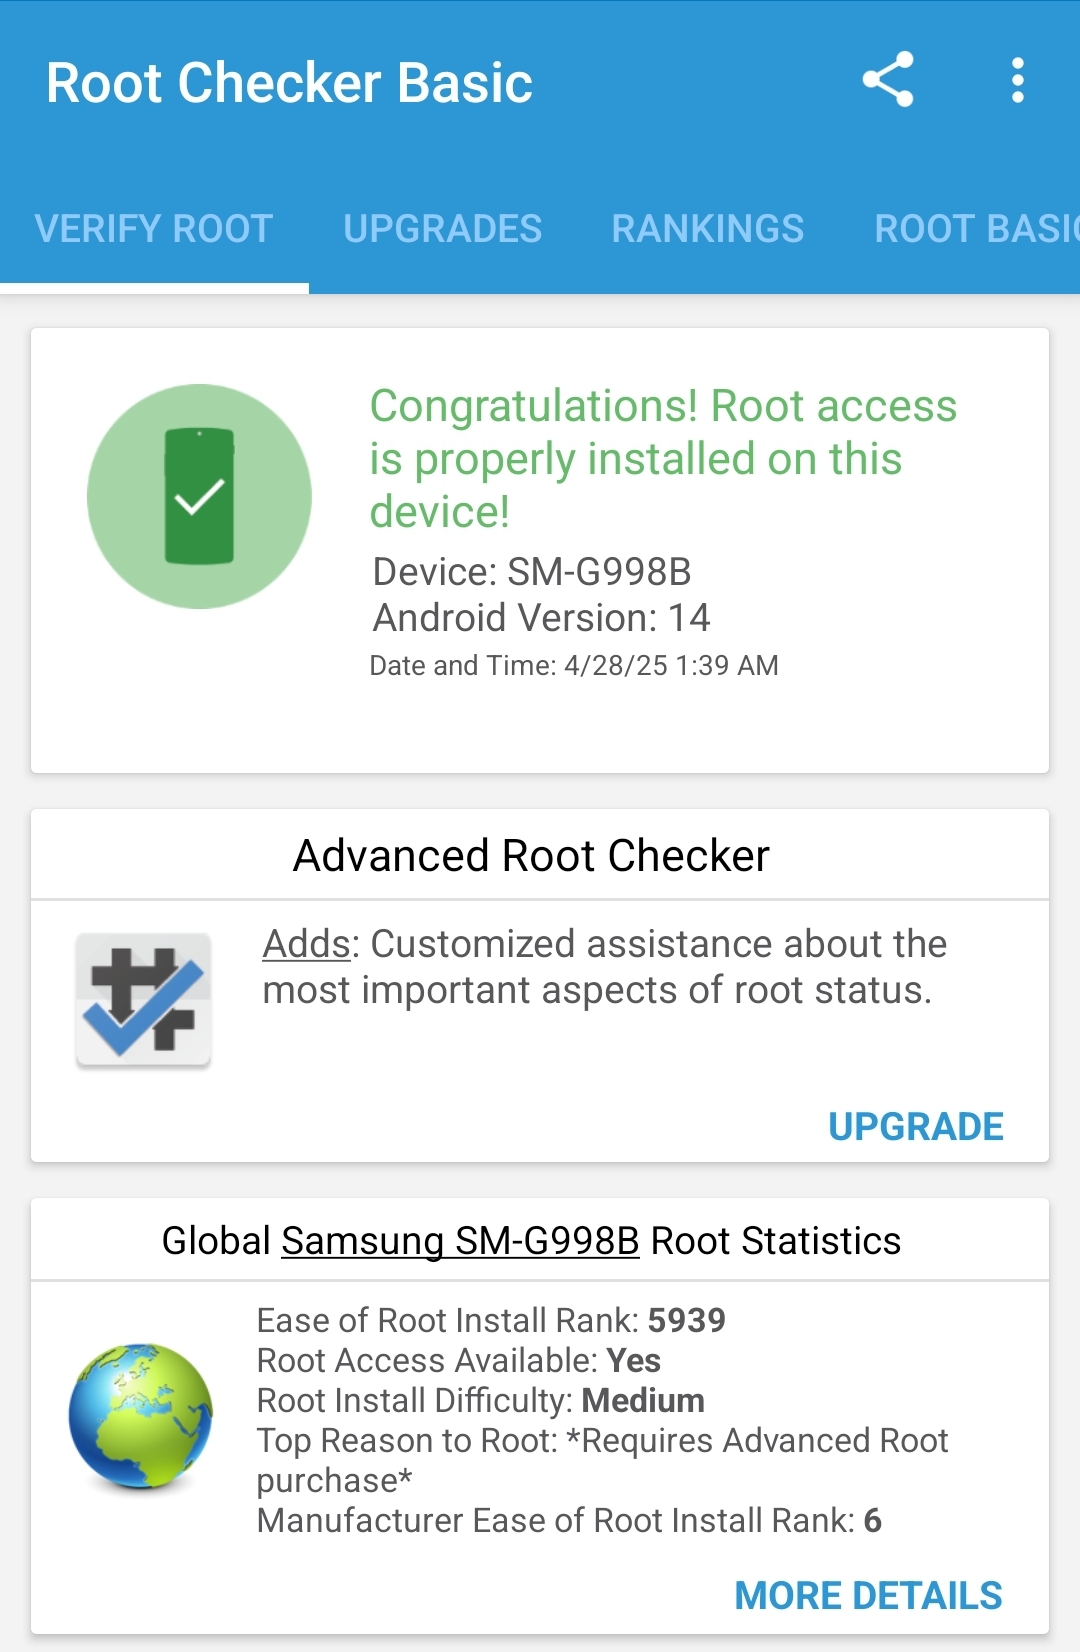
- Make sure to reinstall Magisk again. We’ll be using it later to import our (Burp Suite) proxy certificate.
- Make sure to reinstall Magisk again. We’ll be using it later to import our (Burp Suite) proxy certificate.
0x03 - Installing Proxy Certificates
0x031 - Download, export, and convert the cacert.der
Prerequisites:
cacert.der
In order to obtain cacert.der from Burp Suite, we need to launch Burp Suite first. Next, we can use curl to obtain the certificate without running Browser + FoxyProxy.
$ curl http://burp/cert -x localhost:8080 > cacert.der
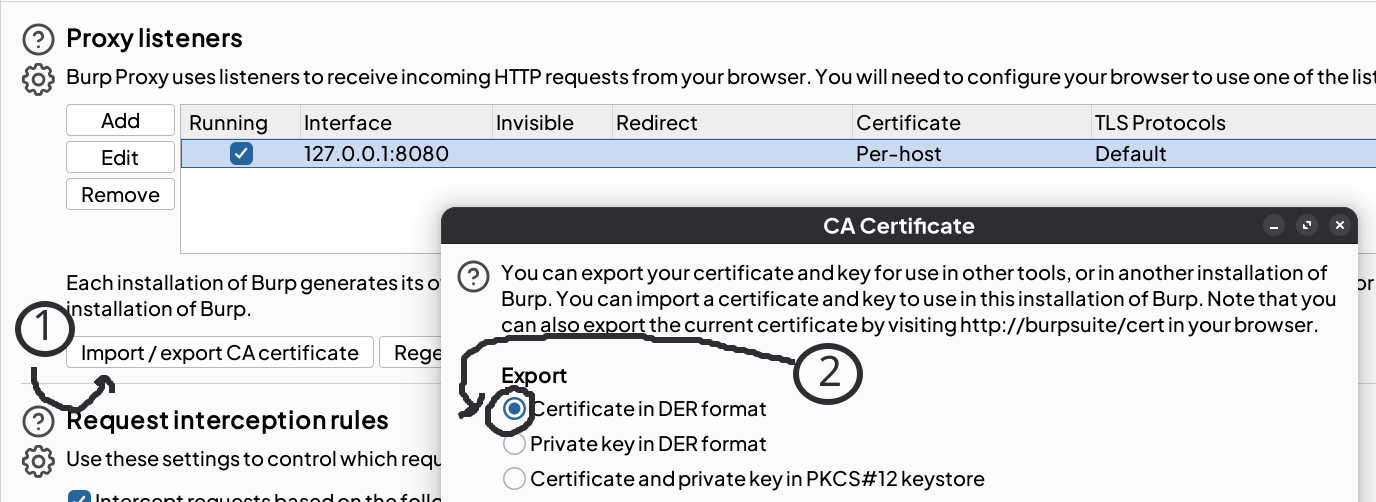
- We can also use another method through Burp Suite to export the certificate, which is located under Proxy > Proxy settings section. Then, click Import/export CA certificate. Once the CA Certificate pop-up has shown, click Export Certificate in DER format.
Next, we convert the cacert.der into PEM format.
$ openssl x509 -inform DER -in ./cacert.der -out cacert.pem
Most Android certificates are named using the hash value of the file. So, we rename the cacert.pem into the hash value $HASH.
$ HASH=$(openssl x509 -inform PEM -subject_hash_old -in ./cacert.pem | head -1)
$ mv ./cacert.pem ./$HASH.0
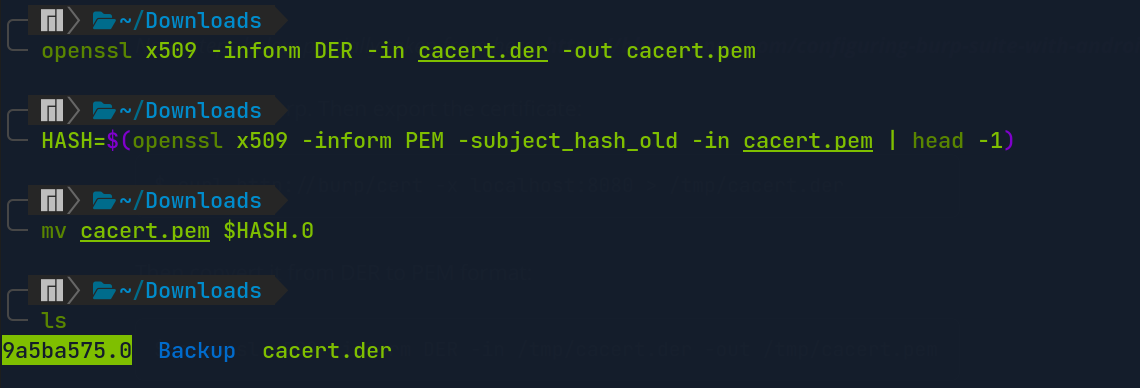 The
The $HASH value is 9a5ba575, make sure to match with this guide.
0x032 - Importing cacert.der to android device
Prerequisites:
- Magisk (Zygisk enabled)
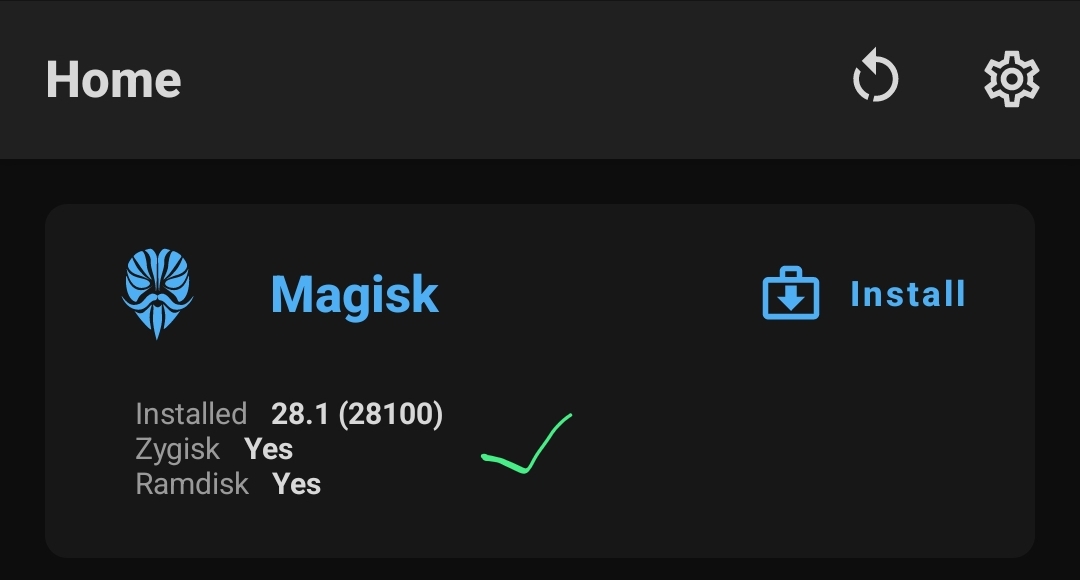
[!TIP] In order to enable Zygisk in Magisk, it needs to be enabled in the Magisk settings and enable Zygisk option.
Once it’s done, reboot the Android. If the Zygisk has been enabled, we can examine the Zygisk has been enabled in the Magisk interface.
On earlier versions of Android, we can simply write the certificates to the android and be finished. There’s a guide from CorSecure on the methods to write certificates. Recent Android versions use a different partitioning scheme, making the method is not reliable anymore. As a result, Android users, even root users, could not mount the /system partition with mount -o remount, rw /system anymore.
In this guide, I’ll show youse on how to write cacert.der into /system CA certificates based on the Magisk module that can be used depending on the Android versions
0x0321 - Magisk Module Template (MMT) Extended (< Android 14)
First thing first, we need to clone the MMT-Ex repository from this site.
$ git clone https://github.com/Zackptg5/MMT-Extended; cd MMT-Extended
Next, we need to remove placeholders and create a new directory /etc/security, which is located in the /system directory. This will create the directory structure that MMT will recreate on the Android when our module runs with Magisk.
$ mkdir -p system/etc/security
$ rm -rf zygisk
$ rm system/placeholder
Then, copy the existing directory cacerts that contains most certificates from the Android into the security directory that we have just created by using adb pull command. Once everything is set, we can move the hashed cacert certificate into the copied cacerts directory.
$ cd system/etc/security
$ adb pull /system/etc/security/cacerts/ .
$ mv ~/location/of/$HASH.0 system/etc/security/cacerts/
Next, we’re going to modify the customize.sh, which is a Bash script that Magisk uses to install the module.
$ cd /location/to/MMT-Extended
$ nano customize.sh
- The
customize.shis located on the mainMMT-Extendeddirectory - The file contains any file system permissions that are configured here will be matched on the Android when the module installs
- Within this way, we can make sure our new certificate has the same file permissions as the rest of the certs on the phone
# customize.sh
REPLACE="
/system/etc/security/cacerts
"
# ...SNIP...
set permissions() {
  set_perm_recursive $MODPATH/system/etc/security/cacerts 0 0 0755 0644
# ...SNIP...
After everything is set, we ZIP-compress the entire contents of the main MMT-Extended directory and export the ZIP file back to the Android.
$ zip -9 -r MMT.zip .
$ adb push MMT.zip /storage/self/primary/Download/
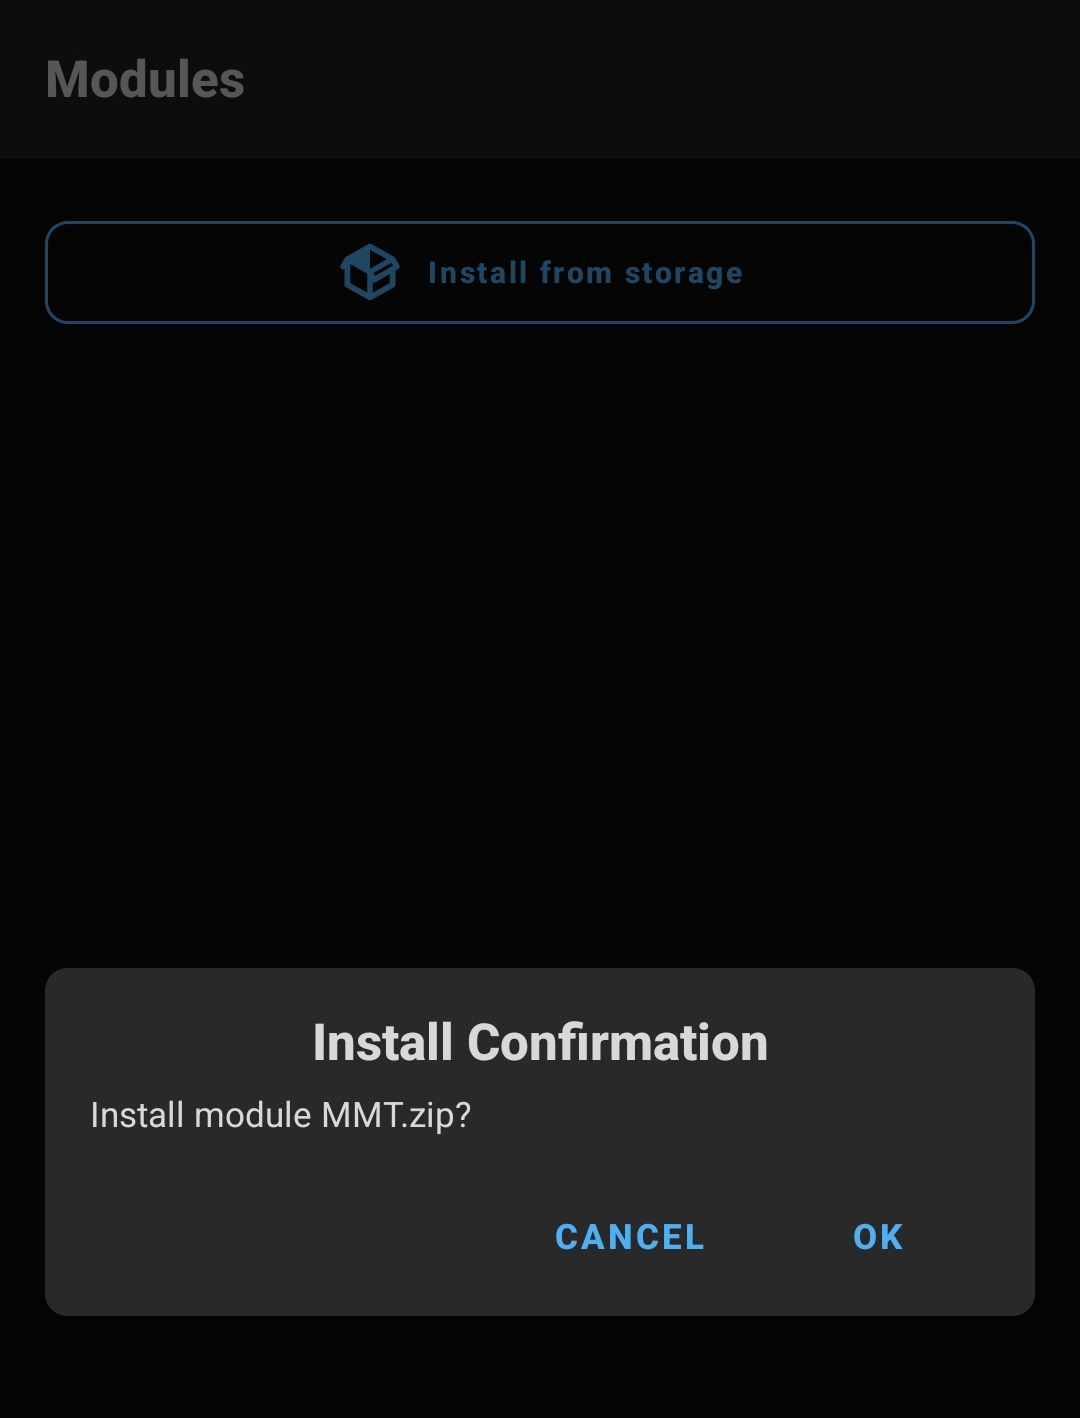
Finally, once everything is set, we can use the exported ZIP file to install modules in Magisk. When accessing Magisk, tap the Modules button, located at the bottom of the UI. Then, tap Install from storage and choose MMT.zip.
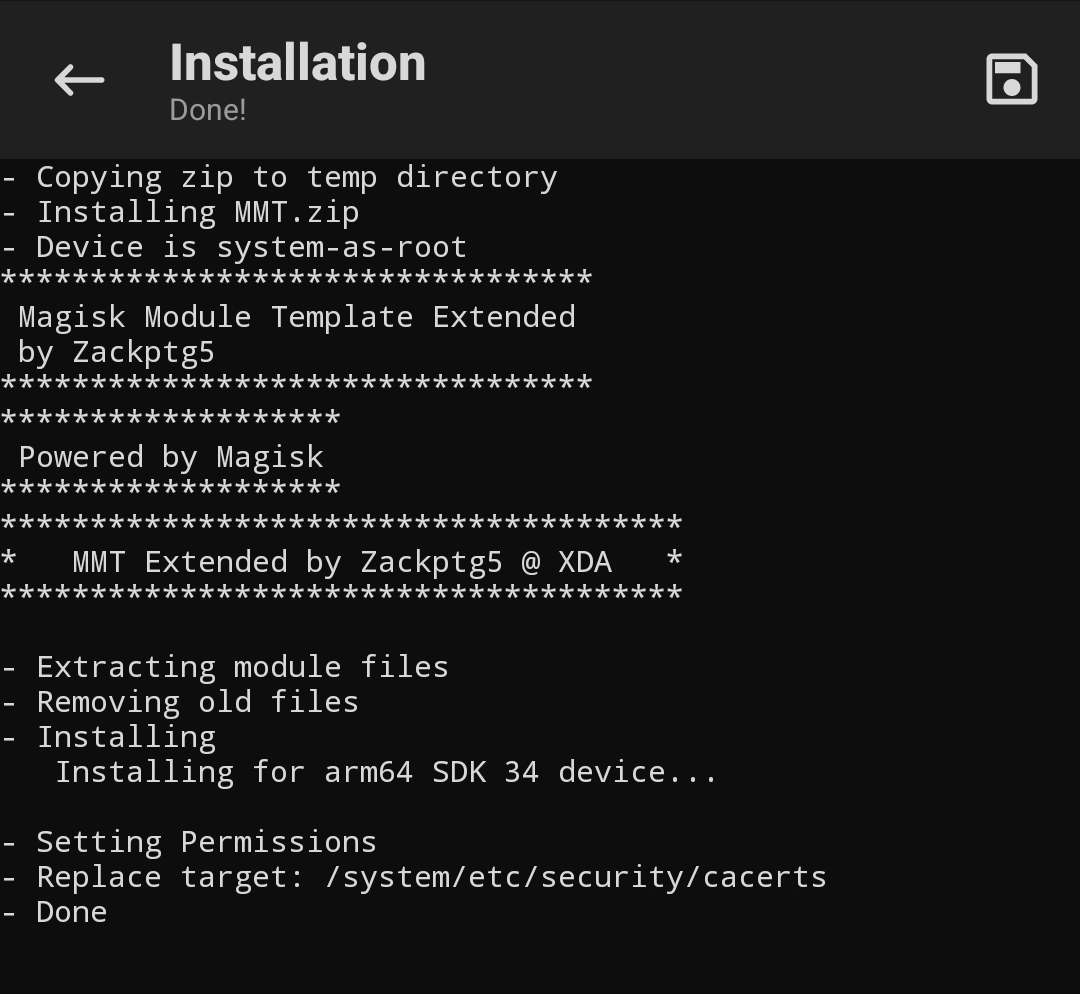
Once the module has been installed, reboot the Android device. If everything runs correctly, we can verify if a new Proxy Certificate has been installed.
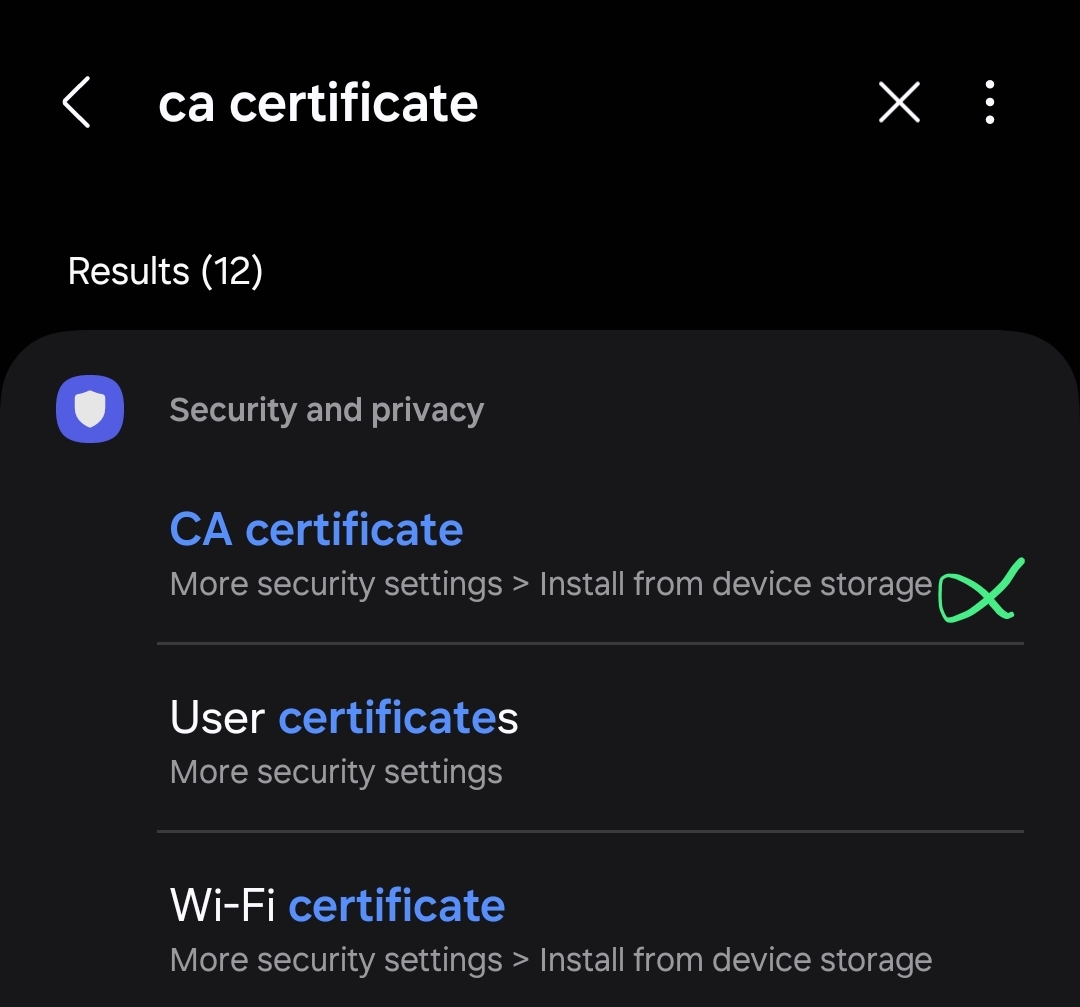
- Search for
ca certificatein the Settings section and tap for User certificates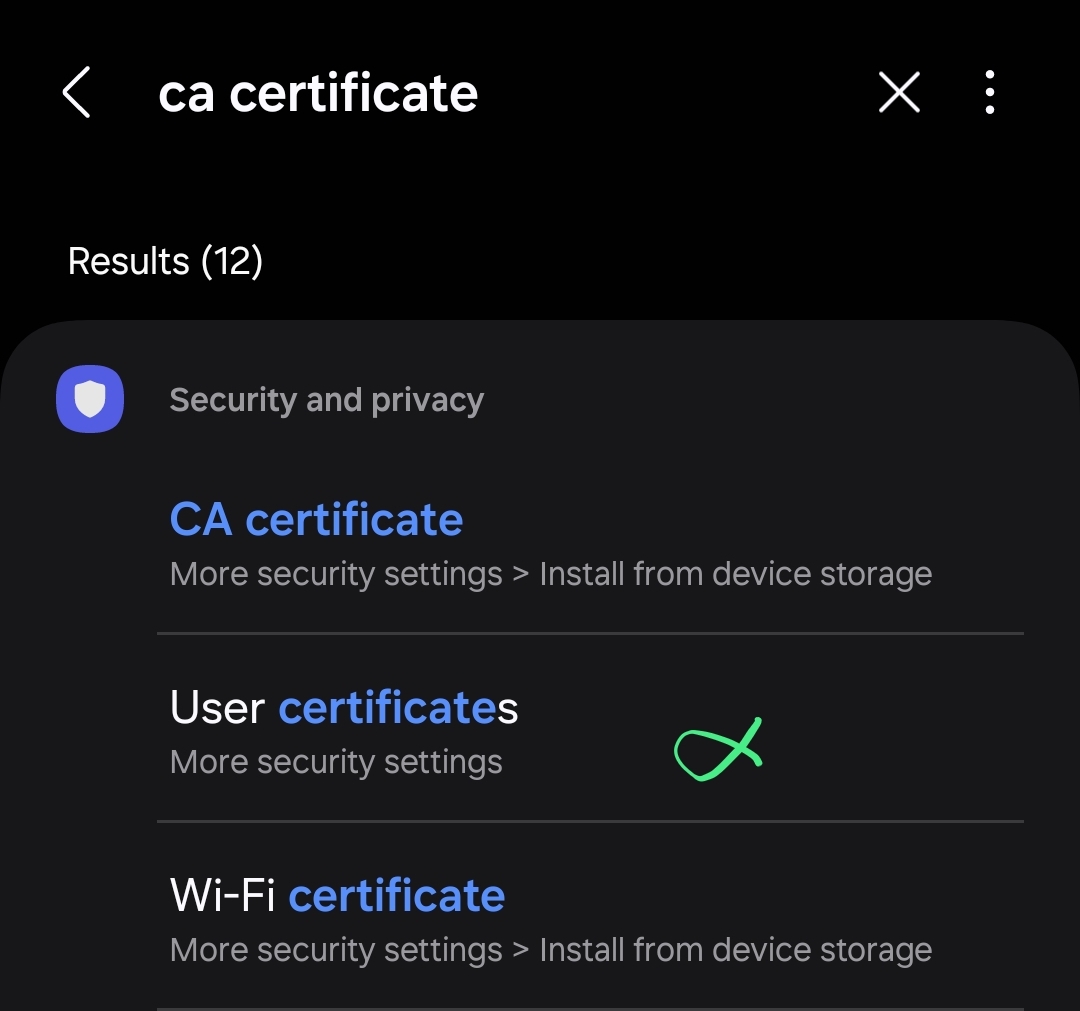
- Next, tap for View security certificates for the installed system certs
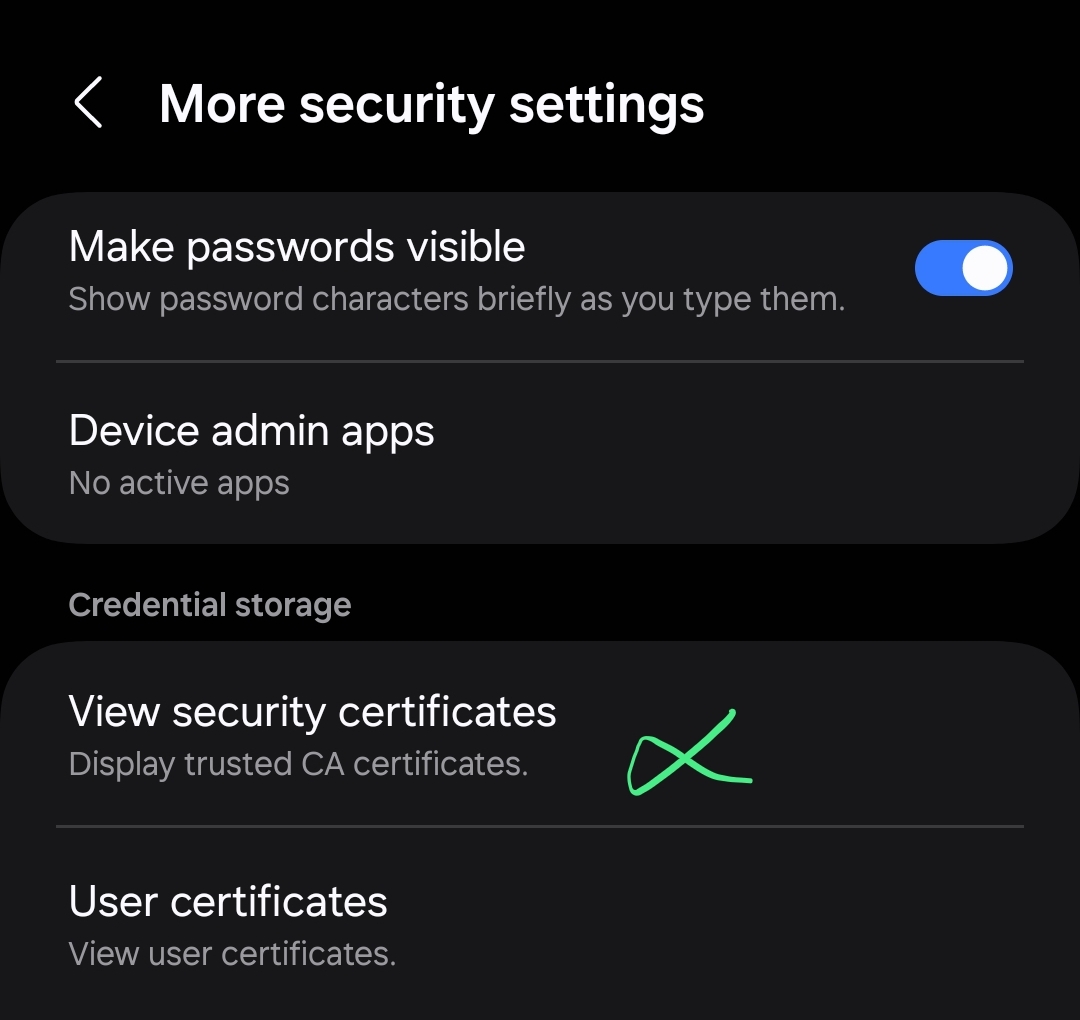
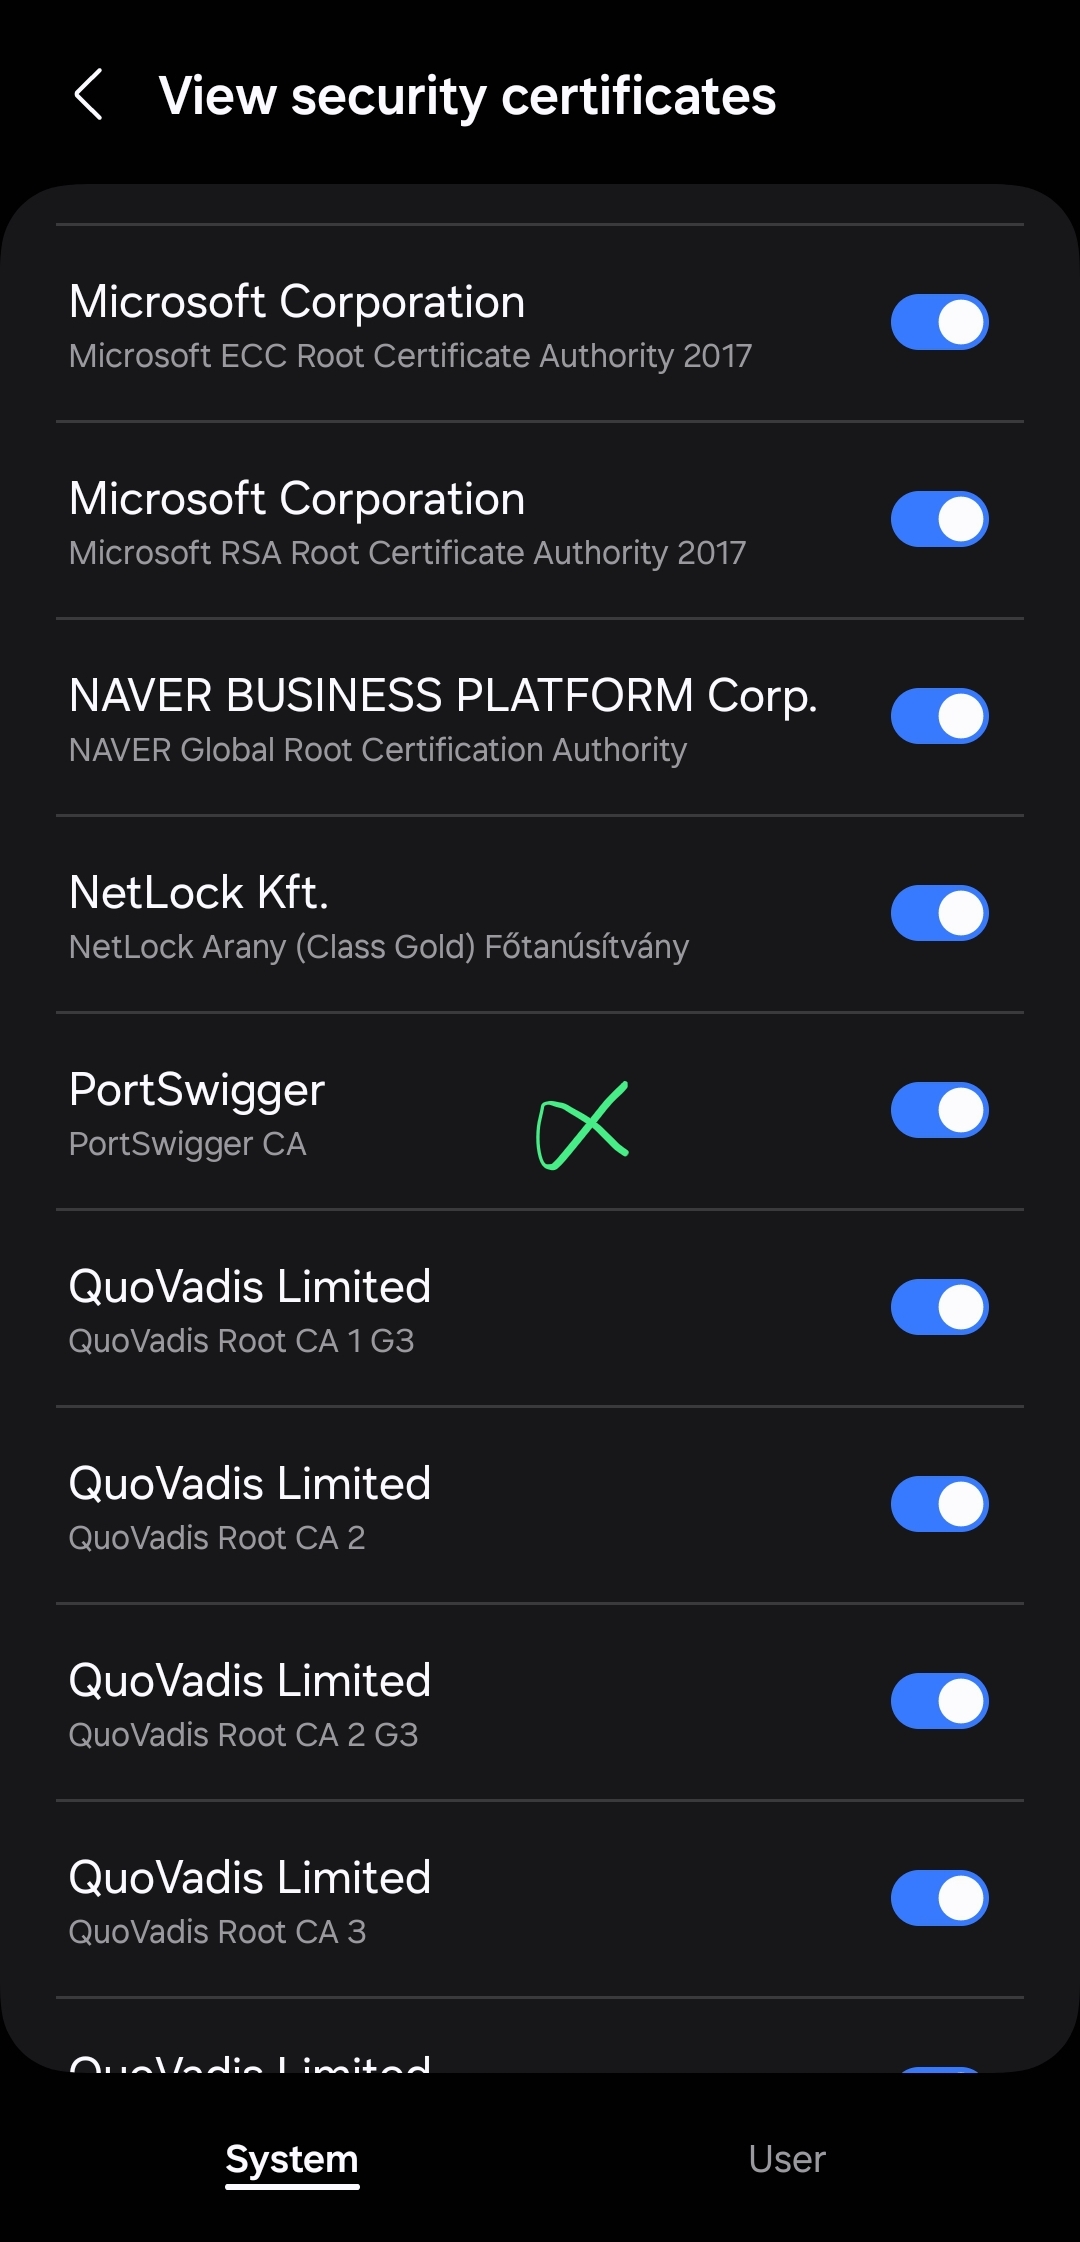
- If everything runs correctly, we may get the Proxy Certificate installed under PortSwigger.
0x0322 - Cert-Fixer (>= Android 14, up to (the upcoming) Android 15)
This is my personal method that I found from another blog. In the latest Android versions, starting from Android 14+ to the upcoming 15, the MMT Module method somehow not working for me. As a result, I found a Reddit guide on how to inject a (proxy) certificate into the /system, which there are another two methods; the method from HTTP Toolkit (I haven’t tried that yet, but I’ll leave to youse to research further) and the Cert-Fixer method, which is a module that can be used in Magisk.
This module installs custom CA certificates to Android’s system certificate storage. Once the module installed with Magisk, the script of the module will write/duplicate all the user CA certificates to the system CA certificate store during Android device reboot. This means we need to upload external certificates that stored to the user first. Although this method rather simple, it requires multiple reboots until the external certificate has been loaded into the system CA certificate.
Since the Cert-Fixer method is rather straightforward, we can download the latest version here. Then, we need to export two files using adb push to the Android device:
- The ZIP file, Cert-Fixer module
- The DER file, Proxy Certificate
$ adb push Cert-Fixer.zip /sdcard/Download
$ adb push cacert.der /sdcard/Download
Once everything is set, load the module Cert-Fixer.zip with Magisk. Before we reboot the device, we need to upload the cacert.der, which through the same search ca certificate, but in this section, we need to
- Load up the
cacert.der, in order to load that proxy certificate into the user CA certificate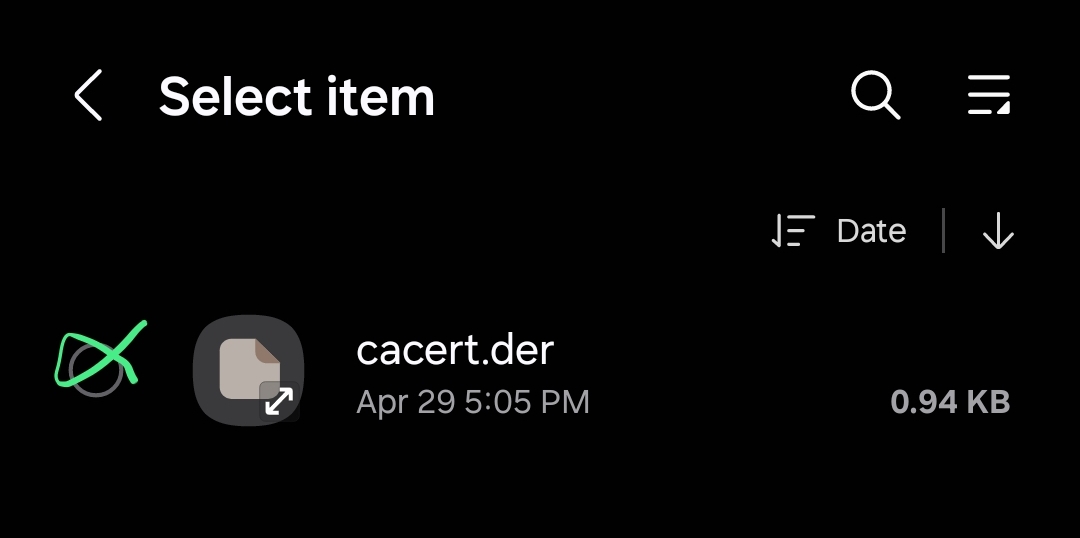 Once it’s done, reboot the Android device. During the reboot, the Magisk through
 Cert-Fixer.zipmodule will duplicate the entire user CA certificates into thesystemCA certificates.
Finally, we can verify the proxy certificate has been installed into the system by accessing Settings > Security and privacy > More security settings > View security certificates and look out for the proxy certs under the name PortSwigger.
0x033 - Verify the certificate through traffic proxying
Prerequisites:
- TunProxy APK
With the proxy cert installed and trusted, we can intercept traffic from running apps. To test it out, we need to export the APK file TunProxy. This will set up the proxy IP and port from the proxy interceptor (Burp Suite), so the application traffic goes to the interceptor.
First thing you wanna do is to start a reverse proxy while the adb is running or the laptop is connected to the Android. This will route a given local port on the phone to a given local port on the host computer.
$ adb reverse tcp:8080 tcp:8080
Next, we can export the TunProxy.apk file. I personally use this proxy app, but youse can use any proxy app tools as desired.
$ adb push TunProxy.apk /sdcard/Download/
Once the APK file has been exported, we can install the APK file directly.
Through this APK file, we can enter the localhost and the port, which often the proxy uses it as a default network for traffic interception, including the application.

Once everything is set, the app traffic should now route through the proxy listener.
0xff - External Sources and Other Guides
Blogs
- OFFICIAL Samsung Odin v4 1.2.1-dc05e3ea - For Linux — XDA Forums
- How to Root Samsung Galaxy S21/S21+/S21 Ultra using Magisk — Magisk
- Start to Finish: Configuring an Android Phone for Pentesting — Black Hills Infosec
- New ways to inject system CA certificates in Android 14 — Reddit
- Installing CA Certificates in System Store for Android 14+ — PwnLogs